|
Mijn Imme
Herbouw van mijn Imme (Engels, met veel foto's, dus downloaden kan even duren)
Imme Freundeskreis treffen 2016 in Immenstadt (Engels)
Imme fabrieks foto's
Imme fabrieks tekeningen
Refurbishment of my Imme
When I bought my Imme it was in a rather good state. On most parts the (original) paint was still in a good condition, with only some smaller rusty spots. The chrome of most parts was also still in acceptable condition. Therefore I decided that it would be a pity to do a total restoration.
Instead I did a complete refurbishment of my Imme. This comprised the following actions:
- Take the motorcycle totally apart
- Thoroughly clean all parts
- Remove rust and repair the paint where necessary
- Polish all painted and chromed parts
- Check the technical condition of all parts, and repair or replace where necessary
- Carefully rebuild the total motorcycle using new bearings, sealings and cabling
The result is a motorcycle in perfect technical condition with acceptable appearance, but visibly old. To my opinion it is not a shame that you can see that this motorcycle is more than 60 years old and used.
Here I want to give you an impression of the total process of the refurbishment.
And of some unpleasant surprises that were off course also included in the bike....
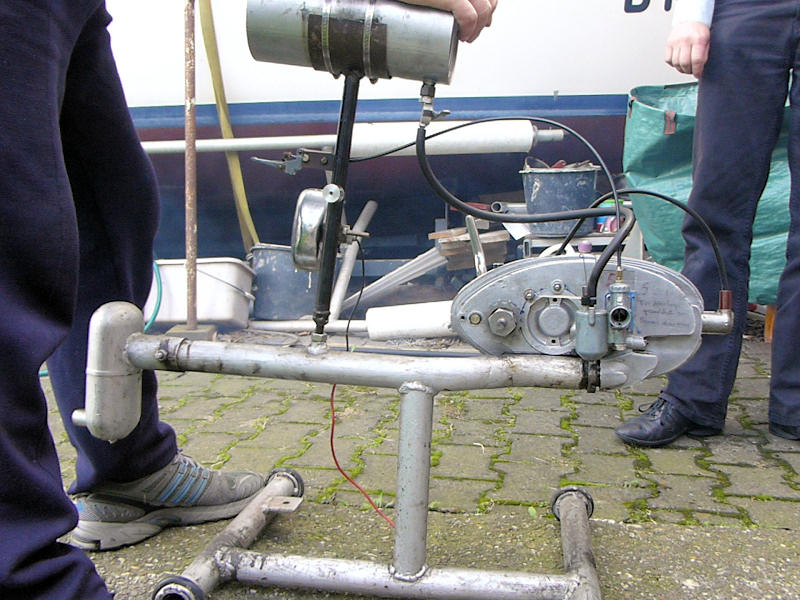
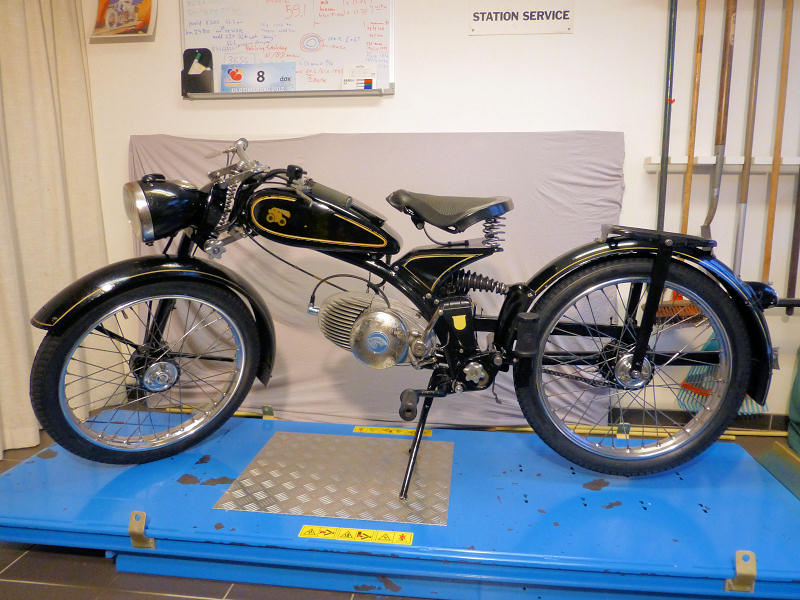
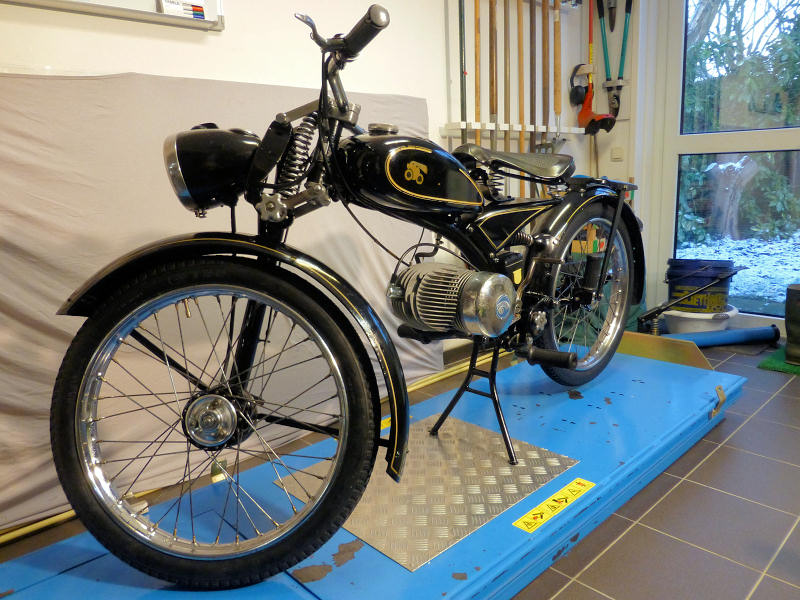
Original state
First a few pictures of my Imme in the condition how I bought it:
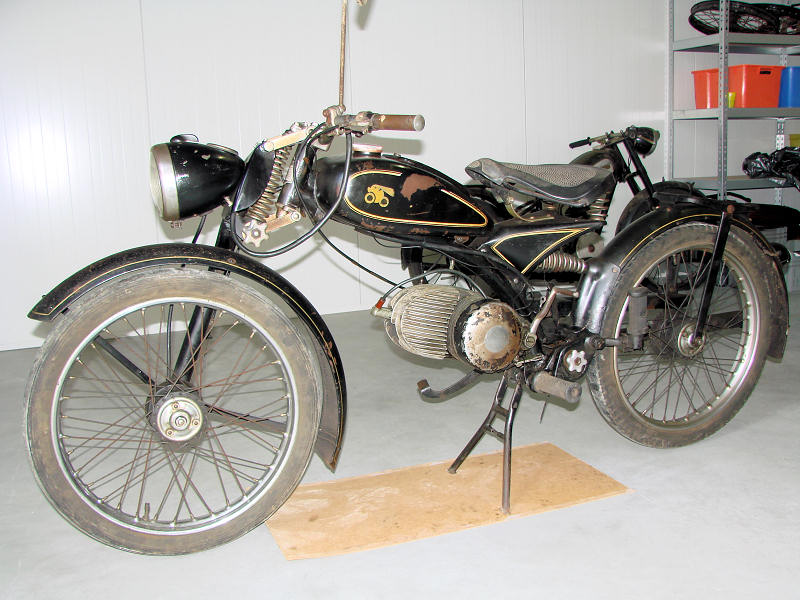
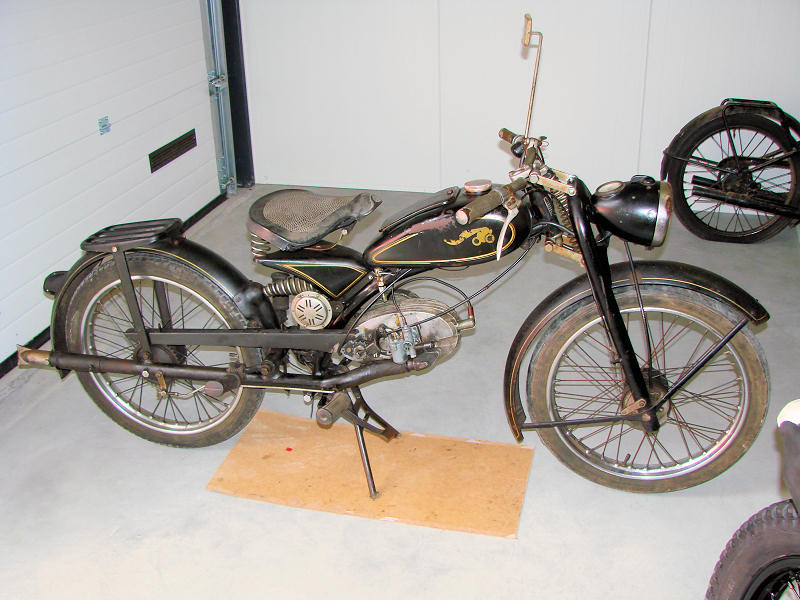
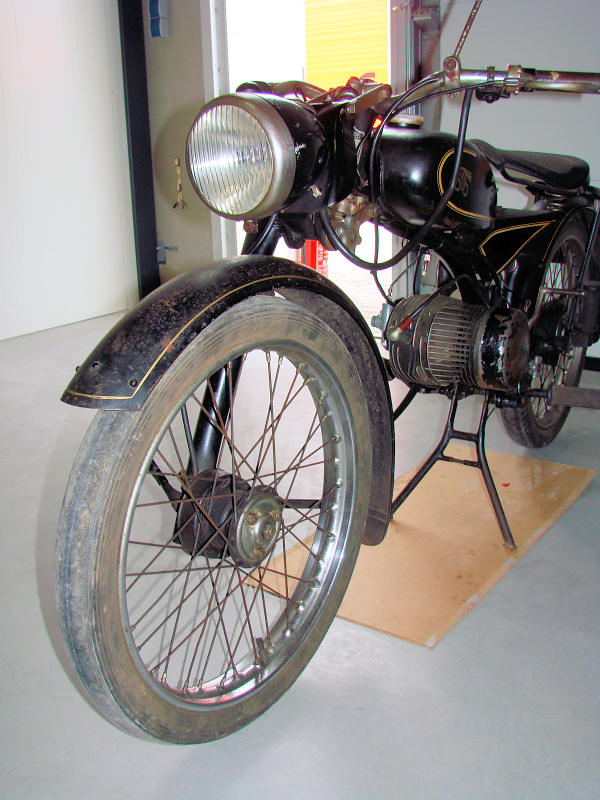
Missing were the drive chain, the filter housing (= right engine cover) and the logo on the ignition cover. Further the bike seemed complete. During dismantling, it appeared that the chain tensioner (underneath the engine), the brake shoe in the rear brake and the exhaust clamp ring were also missing. But altogether the motorcycle was thus almost complete.
Engine overhaul
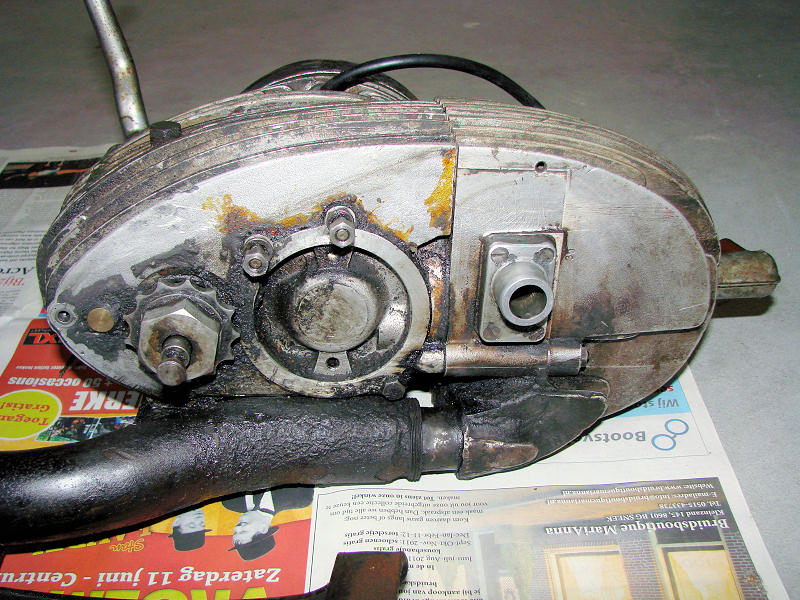
The engine was really dirty and oily:
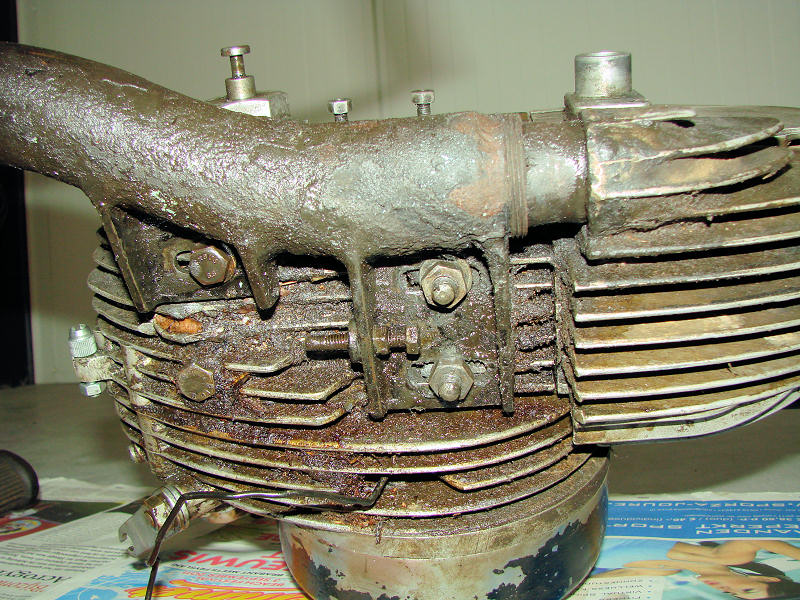
Bottom of the engine - the chain tensioner should be under the 2 nuts in the middle,
with the long bolt pushing against it
During dismantling and cleaning I studied how the engine is built, and I was surprised by the (very) complex construction of the engine. The design seems brilliant, as a minimum amount of materials is used. This is reflected in the weight of the engine, which is surprisingly light compared to the Villiers engines of my Hulsmann motorcycles.
But during the design easy assembly and maintenance were clearly not high on the priority list of Norbert Riedel. All bearings with loose balls and rolls make it very difficult to assemble the engine, and in case of worn bearings they can not simply be replaced by new ones. This also caused the biggest disappointment during the refurbishing of my Imme: the big end (which by the way is surprisingly small) did not look very nice, and the main crankshaft bearing was completely distorted.
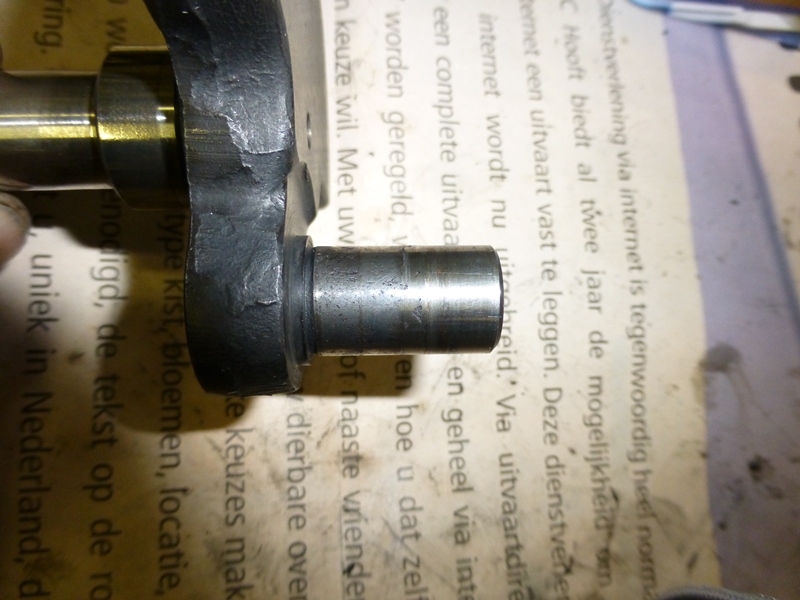
Big end seems worn and has pitting
The main bearing of the crankshaft is seriously distorted - not usable anymore!
A serious problem, what to do?
It is possible to repair worn axes by plasma spraying with molten metal, followed by grinding to the required diameter. But the results are variable, and especially for small diameters the effect appears to be doubtful.
Grinding the big end down to a smaller diameter is not possible, as it's right side must be kept the original size because of the clamping construction of the 2nd half of the crankshaft (my Imme has the double main bearing, introduced after engine no. 2963). When only the middle part of the big end is ground to a smaller diameter, mounting the connecting rod will be almost impossible to do.
In the summer of 2014 I visited the 2-yearly meeting of the Imme Freundeskreis ("circle of Imme friends") in Germany. There I showed the parts of my engine to the engine specialist, Werner. He had a simple solution: the club can deliver brand new crankshafts and connecting rods! Off course this costs some money, but looking at the amount of work it is to make these parts it really seems a friendly price. And I think that a repair of my old crankshaft would have cost at least the same amount of money, with a doubtful result.
The Freundeskreis can also help with other important parts. They can supply new pistons, and bore the (blind) cilinder to the required size, and they have a lot of other parts, used or some even re-manufactured.
Werner has taken my engine home to further analyse it, and organise all the required parts for rebuilding, including rolls and needles of the right size for all loose bearings. After that we have rebuilt the engine together, so Werner could teach me how to do this! A fantastic service. In the end the following things have been done to my Imme engine:
- New crankshaft and connecting rod, with matching bearing needles
- New piston with rings and pen, and cilinder bored to the right size
- All bearings checked and brought to the right axial and radial play (respectively by choosing the right roll size and mounting the correct amount of filling rings)
- Clutch overhauled (dismantled, cleaned, checked and mounted again)
- New latch on the kickstarter axis, plus a special conical spring that fits better in the housing
- All sealings renewed
- Rewound ignition coil, new contact breaker points and condensator
- Some small modifications to the carburettor
Here some pictures taken during the assembling:
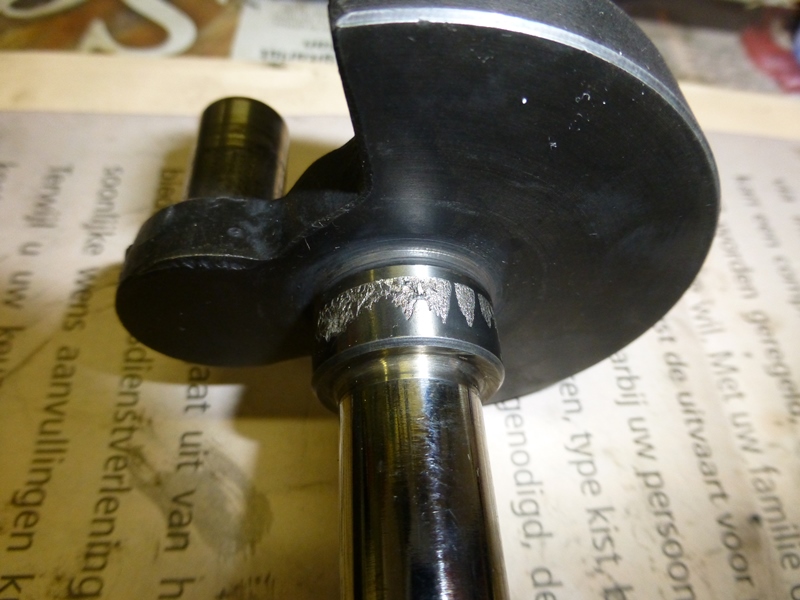
The new crankshaft in the motor housing
The second half of the new crankshaft
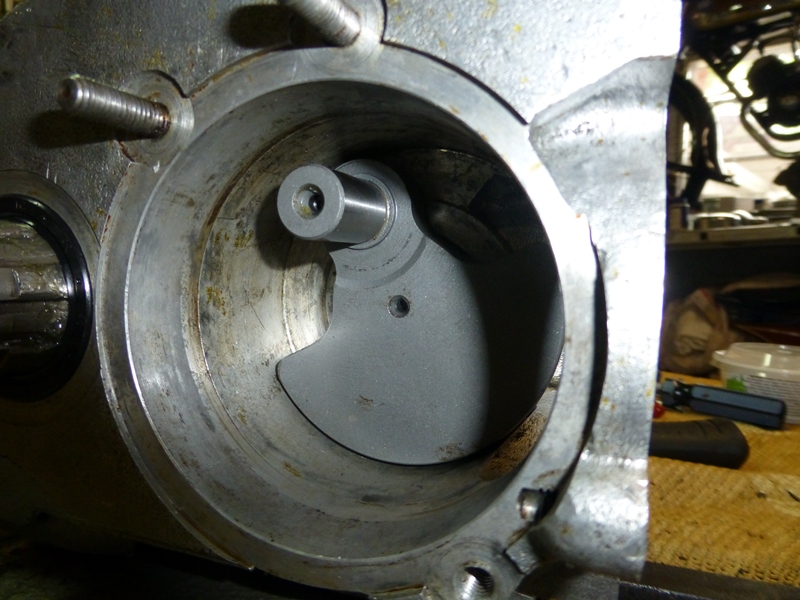
Measuring the alignment and swinging of the crankshaft during assembly of the 2nd half
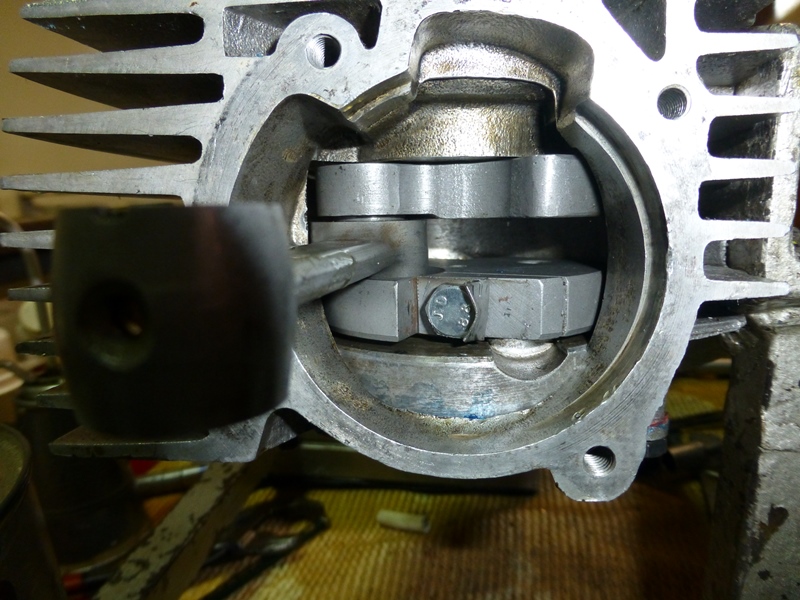
The new crankshaft and connecting rod in the engine after assembly - the locked bolt is for
clamping the 2nd half of the crankshaft to the big end
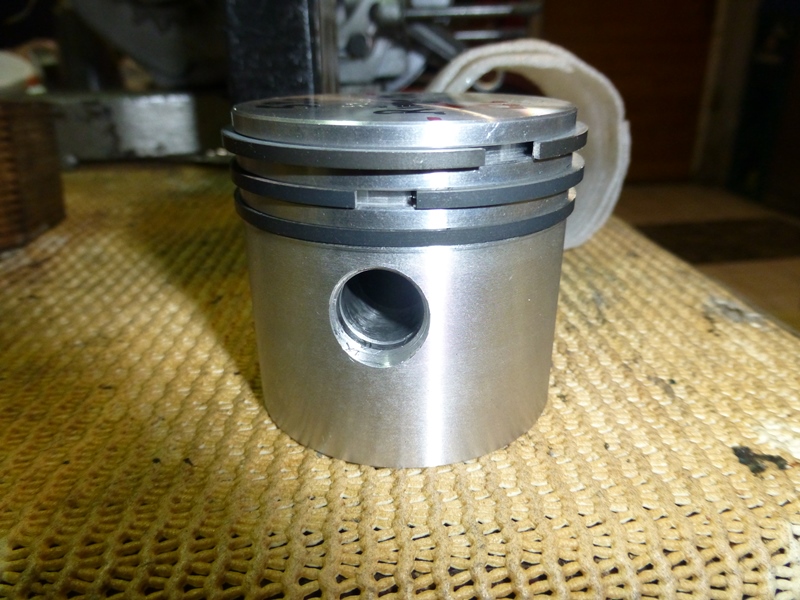
The new piston with rings (diameter 52.95 mm, original is 51.95 mm)
The engine is alsmost ready for a test run:

After the revision and assembly the engine has run shortly on a test stand, so I already know that it is working now:
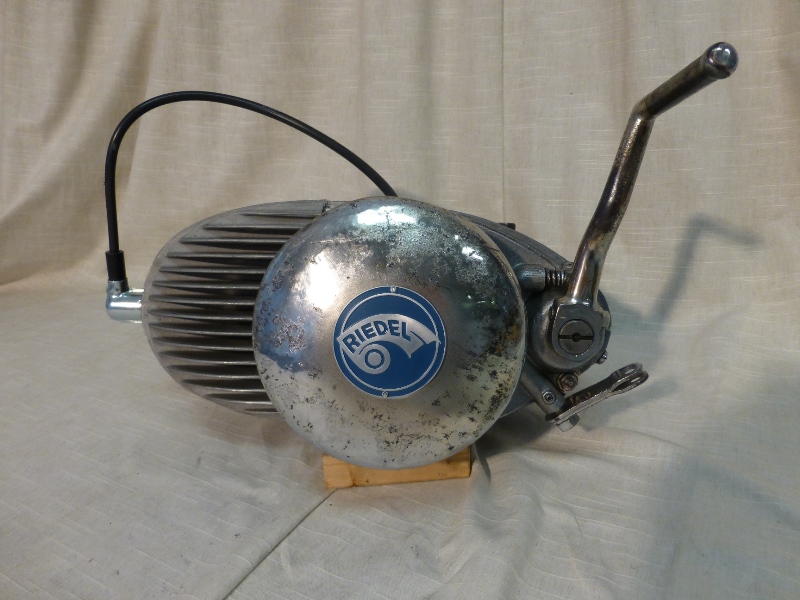
My rebuilt engine
on the test stand
In due time I was so lucky to find a filter cover of which the chrome was in a comparable condition as of the rest of my bike, and the Imme Freundeskreis helped me with a new logo for the ignition cover. After all this work the engine looks almost like new:
Frame
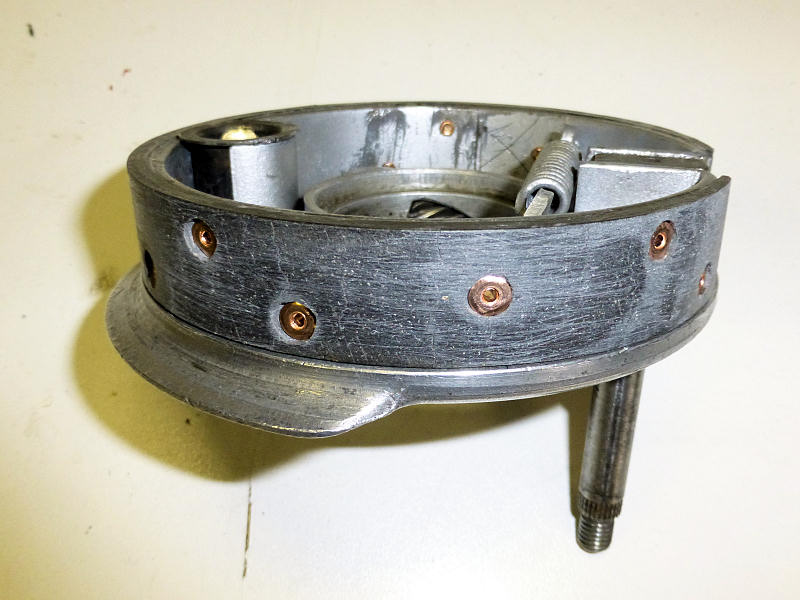
During disassembling the swingarm bearing cones & cups appeared to be in very bad condition:
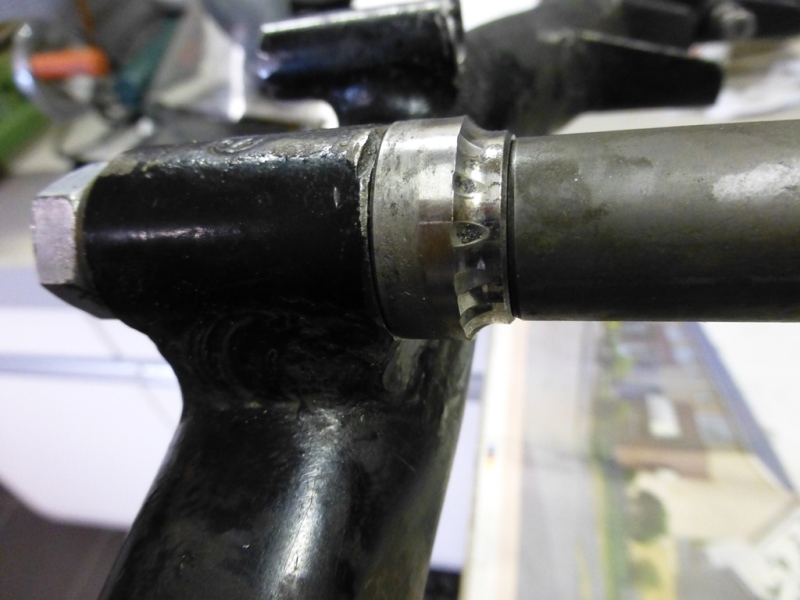
Severe pitting in the bearing cones....
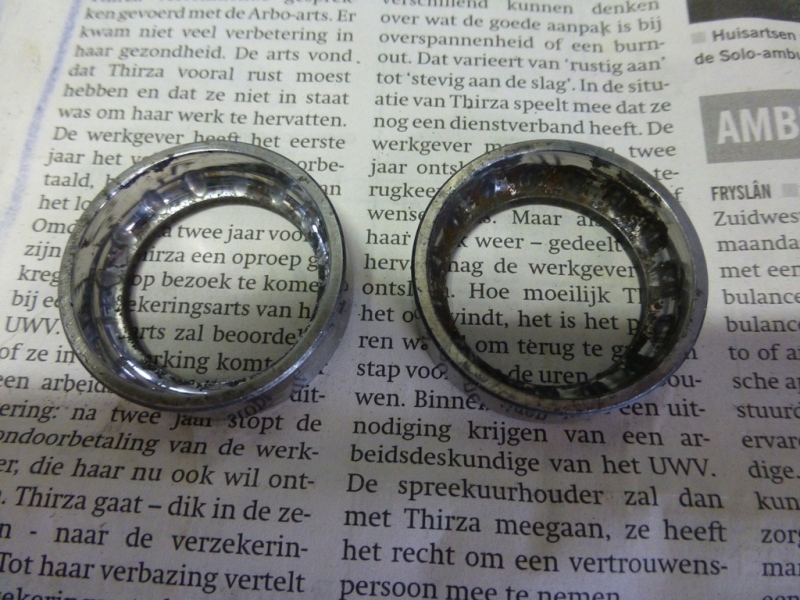
and cups
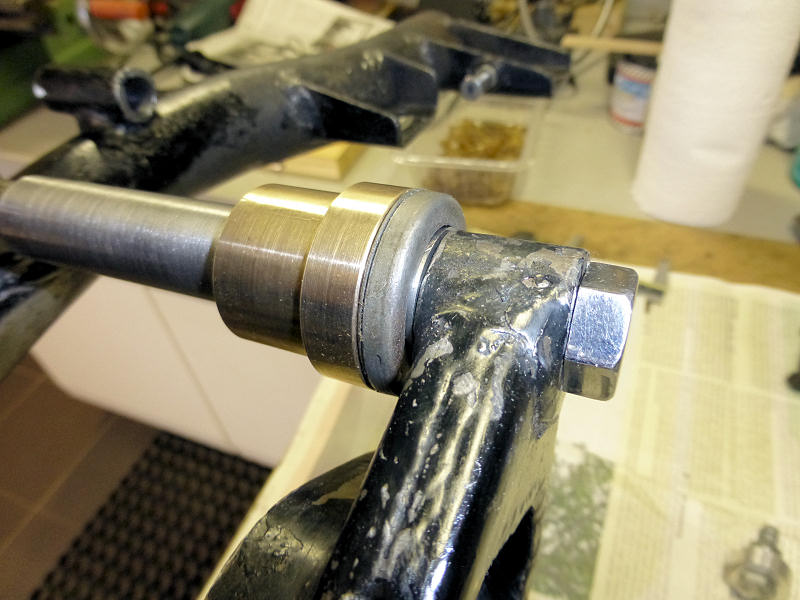
Most probably this is the result of too little grease, in combination with water. It can also be caused by incorrect assembly of the frame. During assembly the axial play of the swingarm bearings must be adjusted by placing enough shim rings between the bearing cones and the distance piece between them (see the thin ring on the next picture).
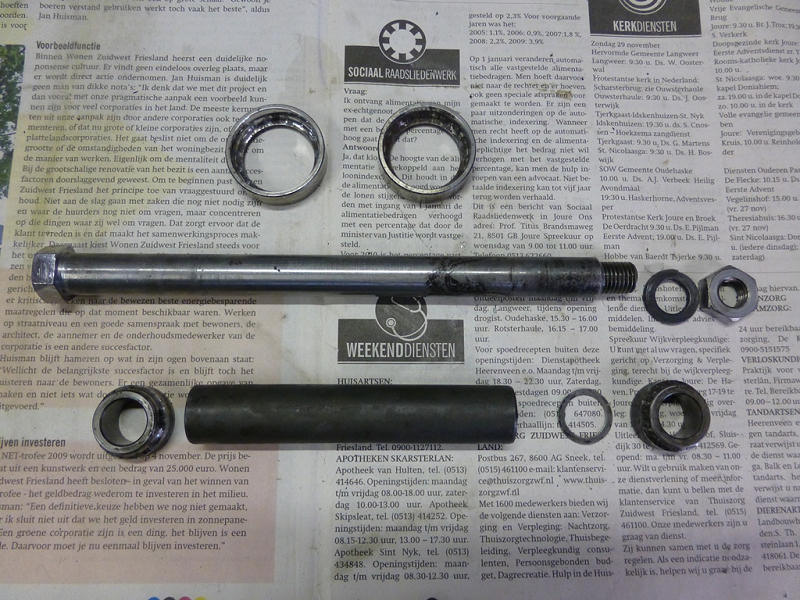
I have made a new set of bronze slide bearings
with steel inner bushes. On the next pictures you can see the original total bearing set (upper picture) and the replacement that I made (lower picture).
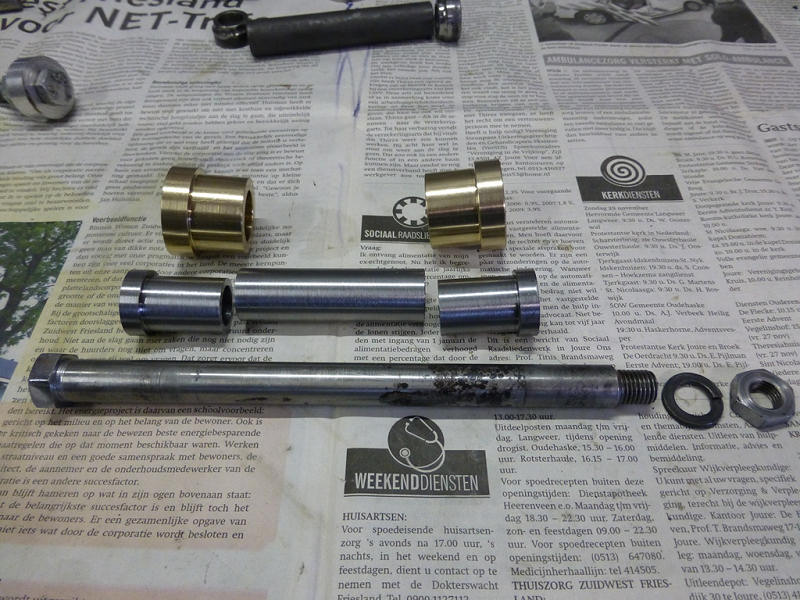
To get the axial play correct, I made the distance piece too large and gradually shortened it, until there was about 0.05 mm play left. To measure the axial play I had to assemble the bearing completely, and measure with a micrometer:
After each measurement I had to take out the distance piece, shorten it a bit (not too much!) and try again. A time consuming activity....
The new bearings are made so that the original felt sealing
rings with their steel caps can still be used. In this way the modification is not visible once the motorcycle is assembled.
The new slide bearing with original sealing in place.
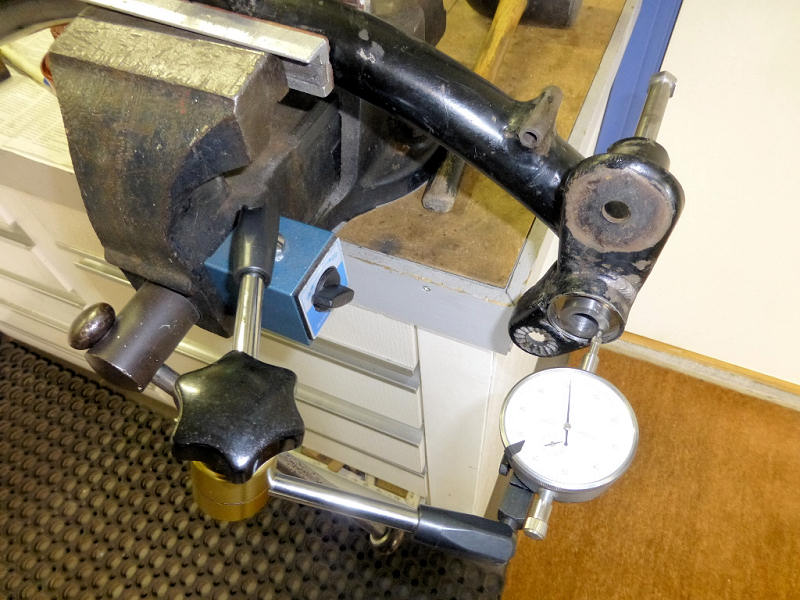
Fortunately the steering head bearing, which is made in exactly the same way as the original swingarm bearing (the cones and cups are even identical), was still 100%. There replacement by slide bearings is not possible because it has to turn very lightly, and this is not easy with a slide bearing that has to withstand both radial and axial forces.
The rear part of the combined swingarm / exhaust pipe was cut off by a former owner, probably to get the exhaust damper easier out for cleaning. A bigger pipe was welded around the end piece, and this was fastened to the swing arm by a single bolt. Although this modification did not have a negative influence on the bike, I didn't like the appearance. Therefore I brought it back to the original construction.
Before welding the end piece to the swing arm, I extensively cleaned the internal of the pipe. Especially at the place where the rear wheel axis is going through the swing arm the passage for the exhaust gasses is very narrow and often carbonized. I scraped out most of the dirt with a long piece of metal with a thin point. After that I tried to get out the last bits of dirt with the high pressure water cleaner. In the end the narrow passages where completely open again.
The next picture shows the modification:
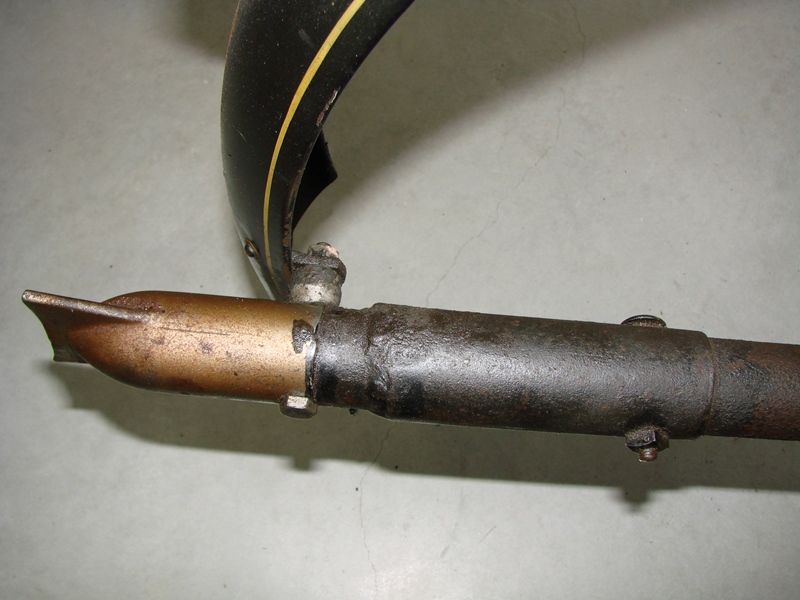
The modified end of the exhaust
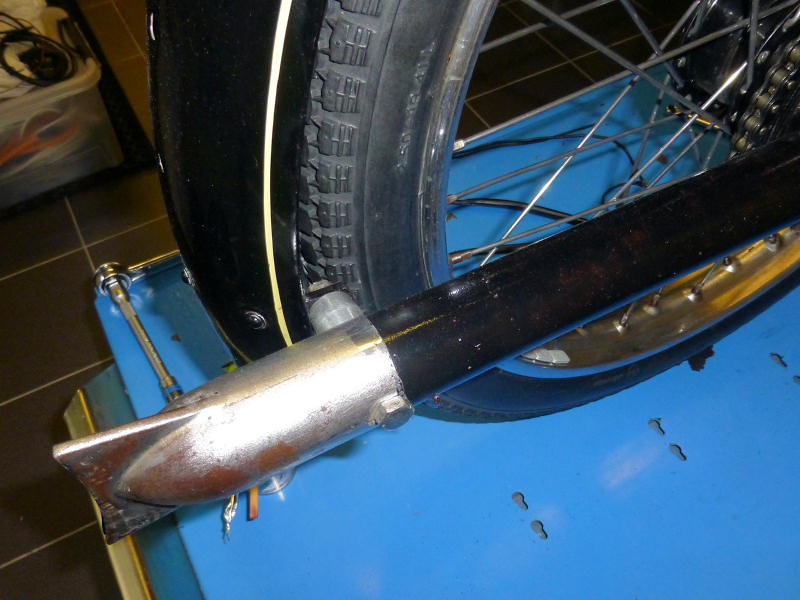
After restoring, cleaning and repainting
The center stand also needed repair. First the middle part of the upper cross pipe had almost completely disappeared, because the end of the retainer leaf spring (that has to secure the stand in upper position during driving) was broken. This was easy to repair, and I got a new leaf spring from the Imme Freundeskreis.
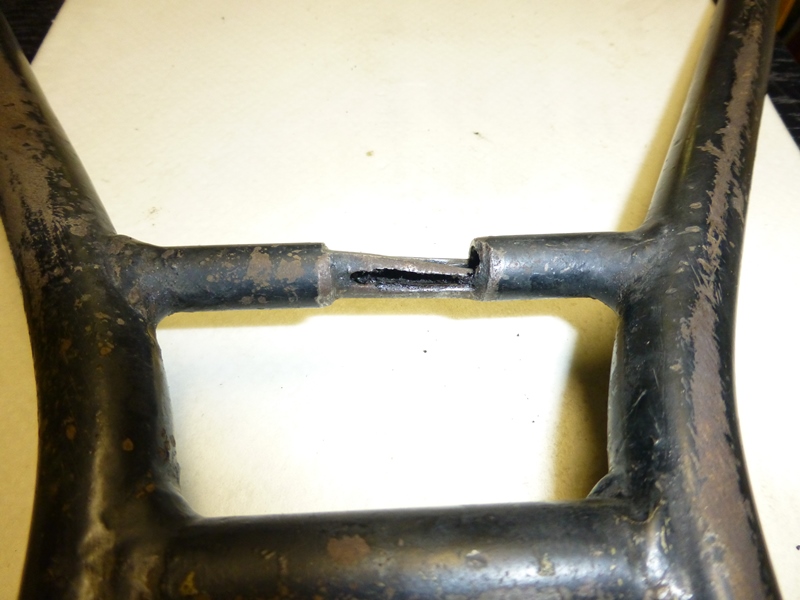
The worn cross pipe; as you can see not much material is left
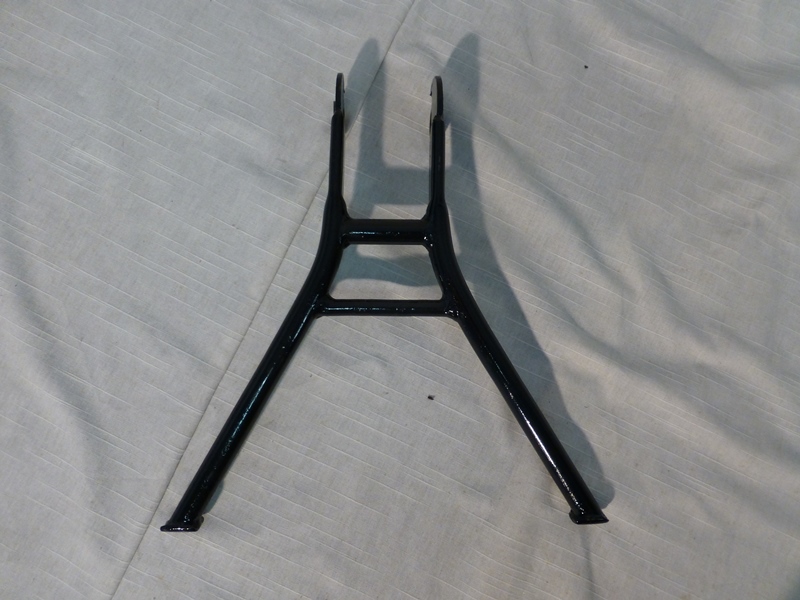
The repaired and repainted center stand
Second the pivot points of the center stand were seriously worn. The holes in the stand had become unround, and the mounting bushes showed wear. I drilled the holes a bit bigger, and made a set of new bushes. To make the assembly of the stand easier, I made the bushes in 2 pieces. The small ends, that fit into the holes in the stand, in bronze (better suited for bearings than steel) and the big end in steel. With this the center stand makes again a nice turning movement, and does not wiggle anymore.
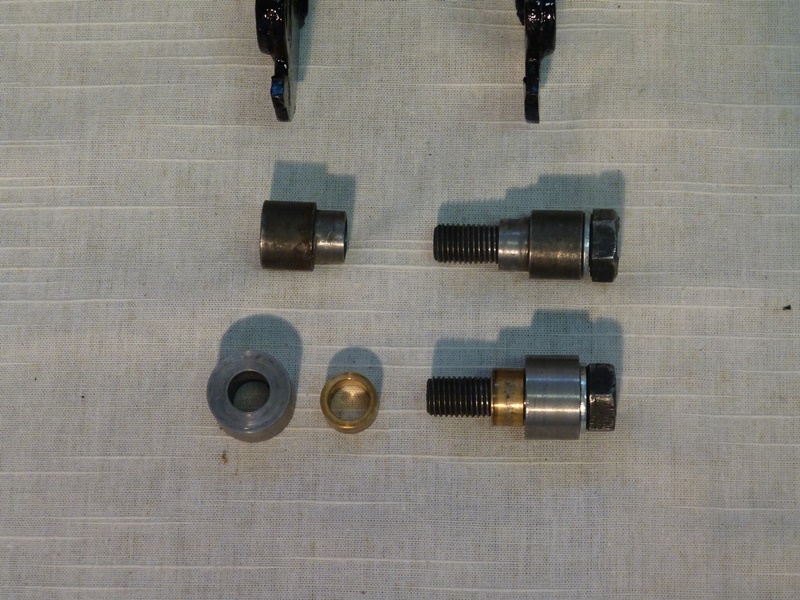
The original (upper) and new (bottom) bearing bushes of the center stand
The new retainer leaf spring for the center stand (after assembling the bike)
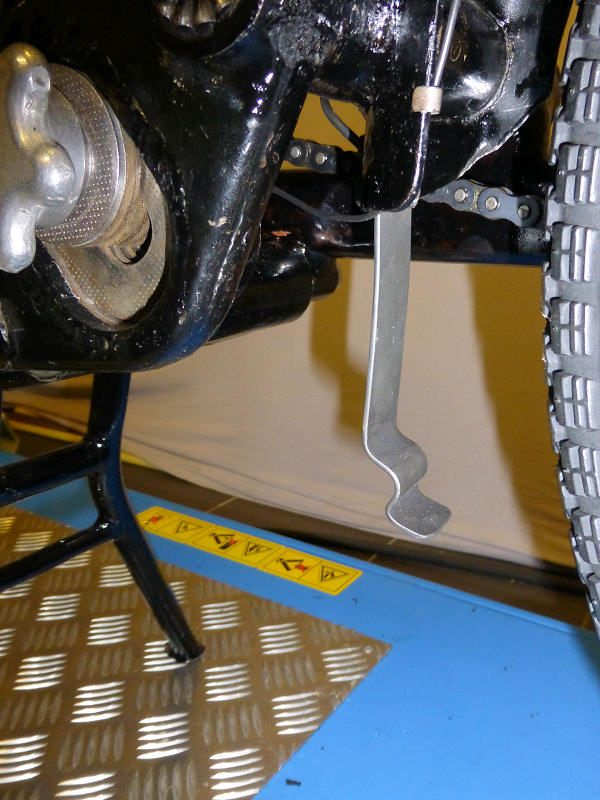
Finally I had to repair the cracked chain guard, and renew the axis of the rear brake pedal, which was in bad condition and had quite a lot of play in its mounting bush.
Rear brake
pedal with new axis
Paintwork
The paintwork in general was very dirty and completely matt. Especially the tank, which seemed to be coated with an extra layer of varnish over the black paint. And off course there were some spots were the black paint had been damaged or disappeared, and replaced by rust.
I started with good cleaning and polishing of all painted parts. After this the rust was removed, and the
blank spots were repainted. Only a big part of the swingarm/exhaust pipe and the stand were almost completely paintless. These have first been coated with anti rust, and next painted black again.
The following pictures show some examples of parts before and after treatment:
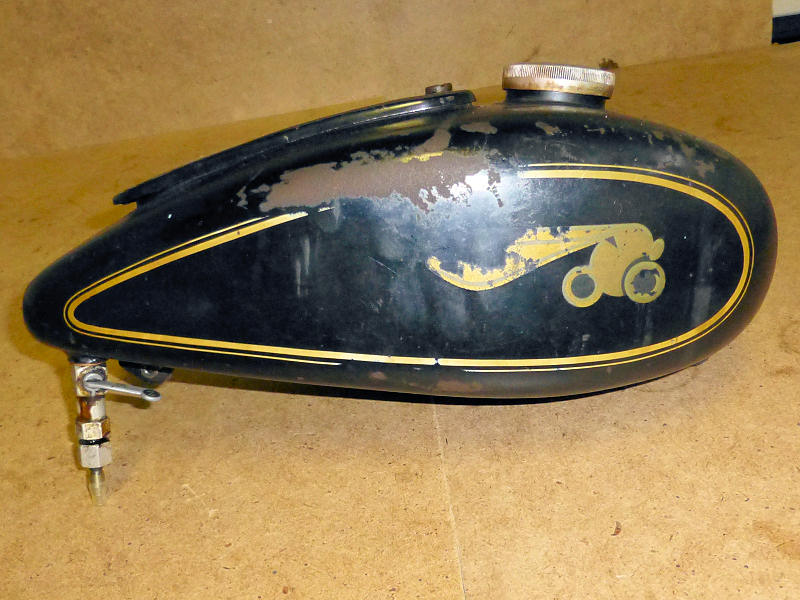
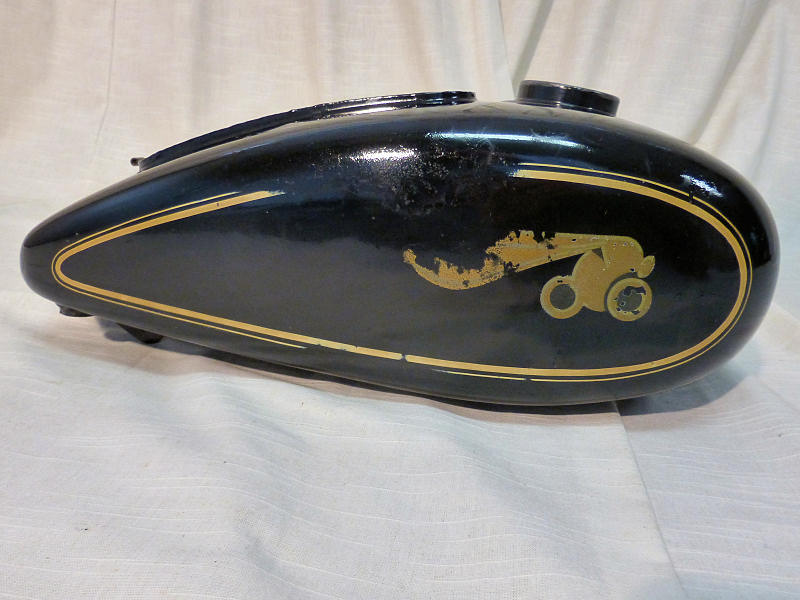
Rusty spot repainted and total tank polished
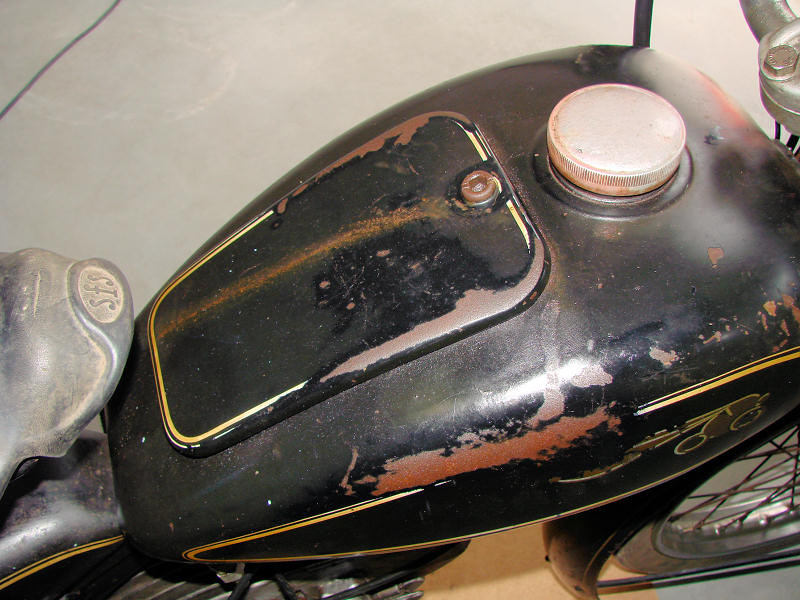
Tank cap was painted with Hammerite and coloured reddish from petrol
After removal of the paint the tank cap appeared to be in perfect condition
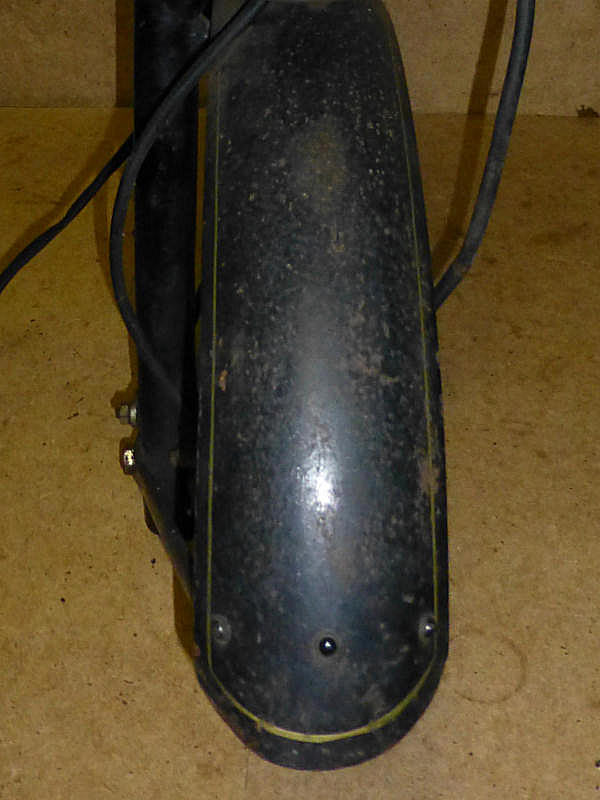
Front mudguard with a lot of small rusty speckles

All speckles touched up with paint and total mudguard polished
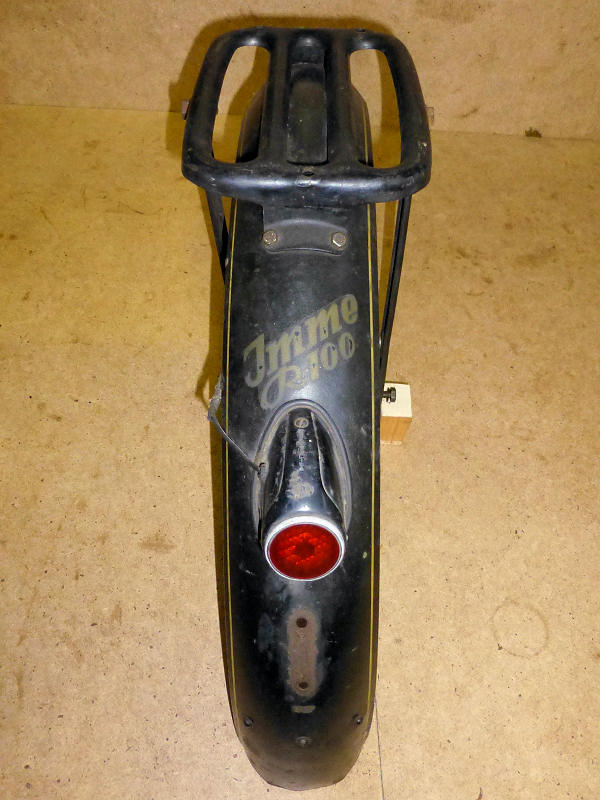
Rear mudguard
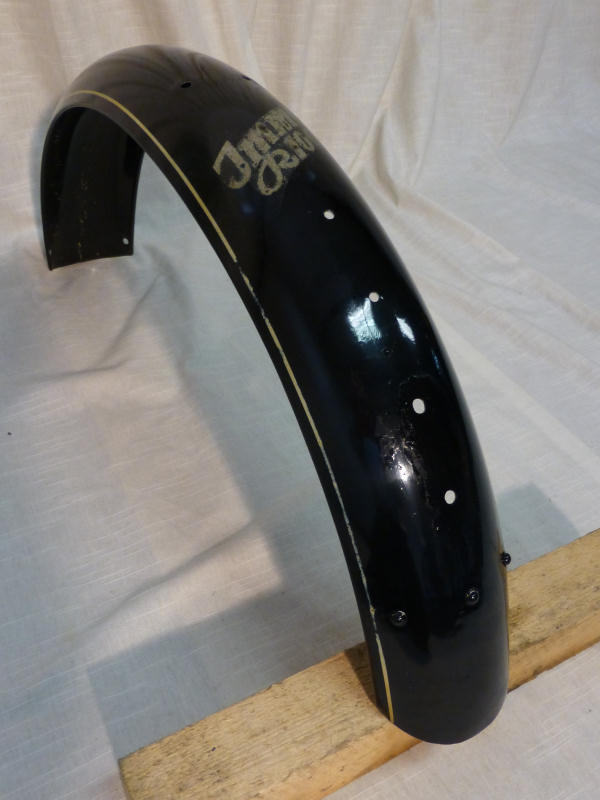
Rusty spots repainted and total mudguard polished
The Imme transfer is unfortunately in bad condition
Metal parts
The chrome has also been influenced by time. On some parts the chrome has disappeared, which gave oxygen a change to oxidize the underlying steel. But on most chromed parts the majority of the surface is still chrome, and the rust only on a lot of small speckles. The same holds for the zinc or cadmium on the other galvanized parts.
By brushing with a soft rotating steel brush, followed by intense polishing with chrome polish, all galvanized metal parts have been cleaned up. On most chromed parts the result is reasonably satisfying.
One of the lesser parts is the handlebars, where a lot of the chrome seems to have loosened from the underlying metal. But as most chrome is not scaled off, the surface is quite rough but still not rusty! Also the inside of the rims was quite rusty, probably by entrance of water between the rims and the tyres when the bike was still in use.
Bare aluminum parts were off course also oxydized and thereby dull. But not the engine parts, probably because they were rather dirty and fat. This has probably protected these parts. The dull parts have been intensively polished, and most of them are shining again as if they were new!
Here some examples of parts before and after polishing.
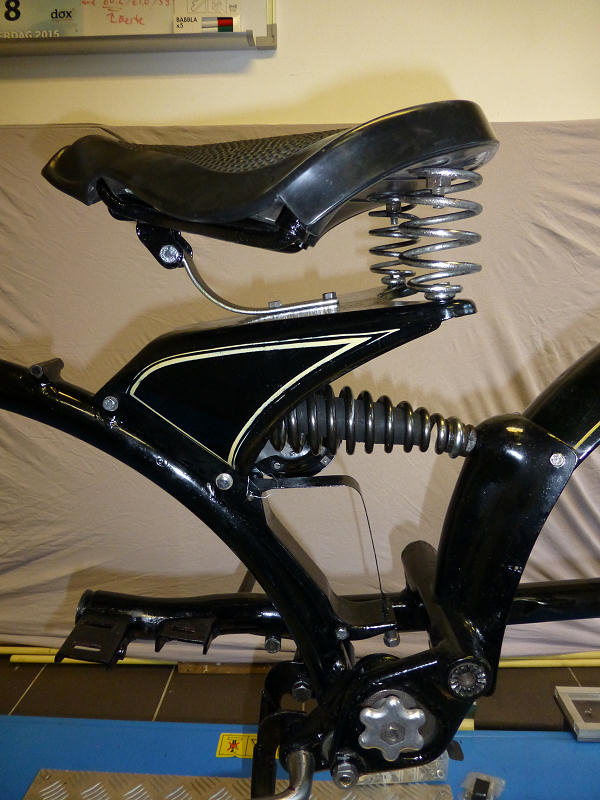
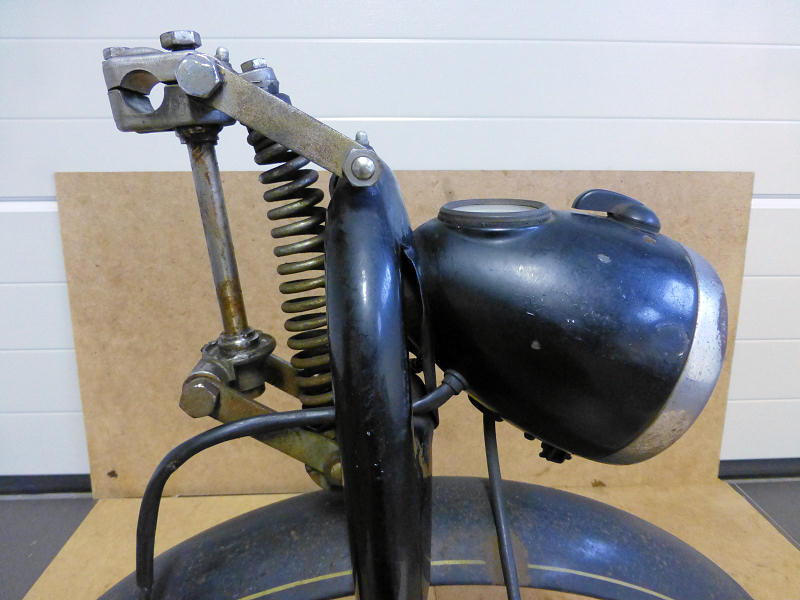
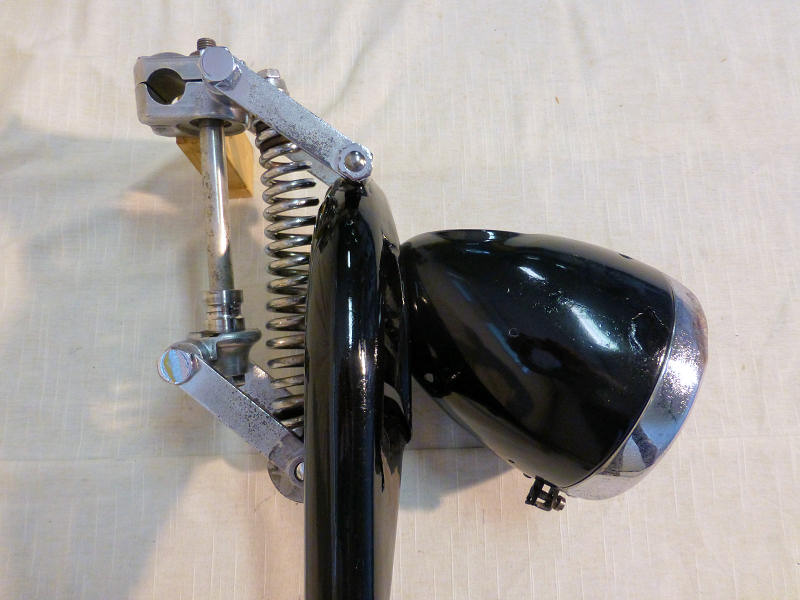
Chrome parts of the front suspension - left polished, right original
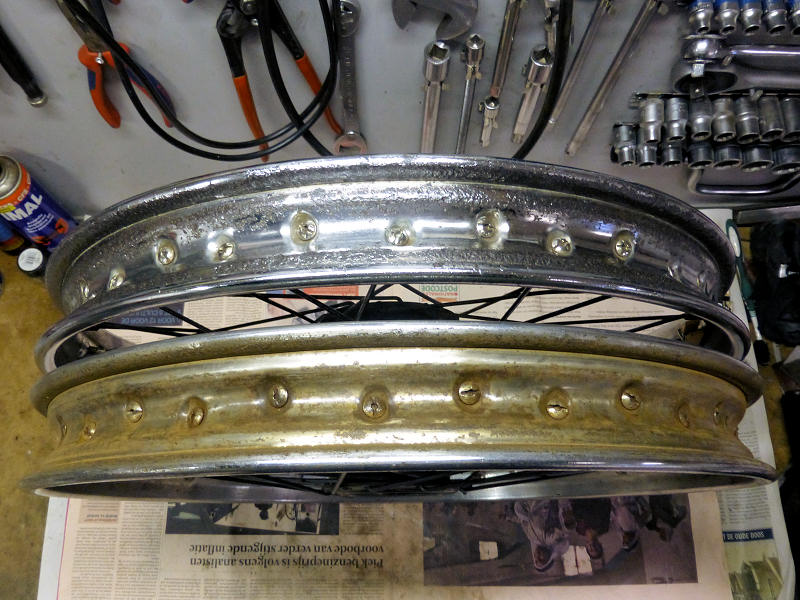
The 2 rims, one polished and
the other not
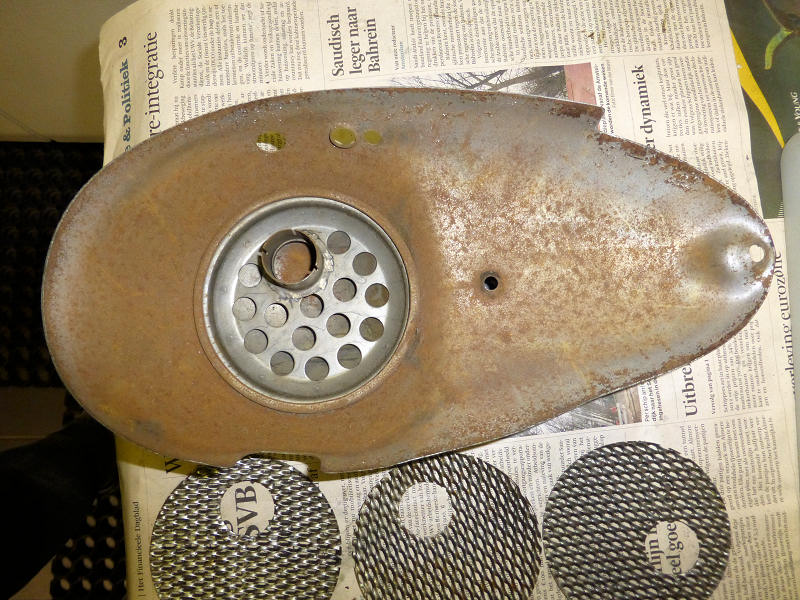
Inside of the engine filter cover, before....
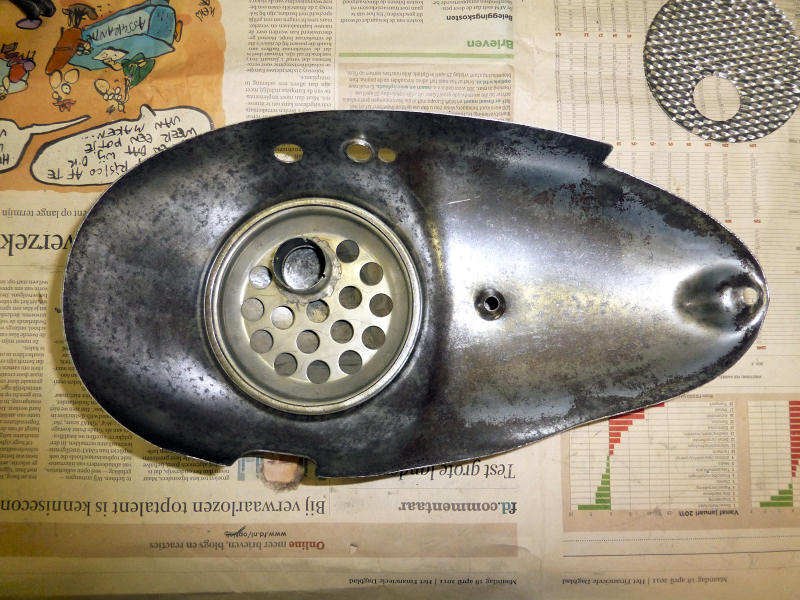
and after brushing & polishing
Aluminum parts before (left) and after (right) polishing
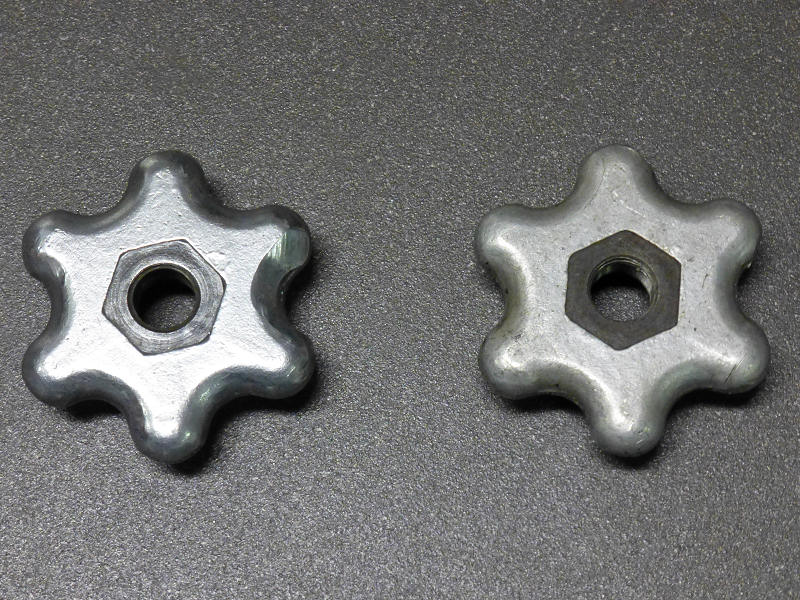
Damper adjusting knobs before (right) and after (left) polishing
Various
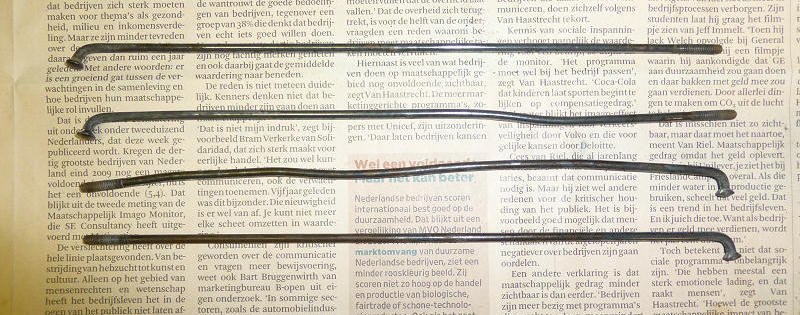
The wheels were not completely straight anymore, although the tension in most of the spokes was still OK. I tried to straigthen the wheels by adjusting the spokes, but it did not help much. Finally I decided to take the wheels completely apart, and rebuild them. This also gave the opportunity to clean-up the spokes and hubs a bit better.
When I had dismantled the wheels it became clear that some repair work had been done in the past. Obviously some spokes had been replaced, without completely dismantling the wheels. This means that the new spokes had been bended to get them in their place between the other spokes, with the following result:
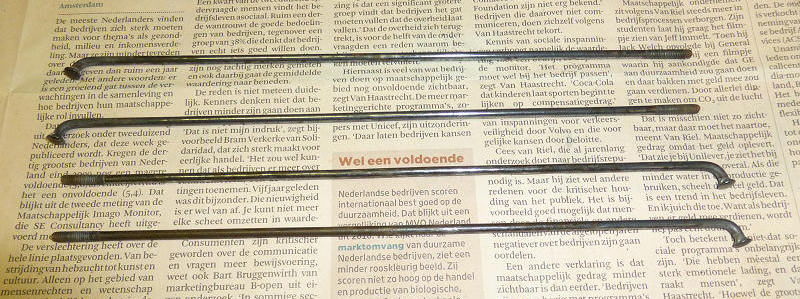
After straightening and polishing they looked much better:
One of the rims was slight buckled, and I could slightly reduce this by carefully bending the whole rim a bit. Next the hubs were cleaned and polished, and the paint touched-up.
After that the exciting moment came: rebuilding of the wheels. As this was in fact the first time for me to spoke a wheel, I expected that I should have to re-start a few times before I got a satifying result. But surpisingly, the first wheel was OK after the first attempt, and it only took me a few hours! Also the second wheel was rebuilt without problems.
The rebuilt wheels are nicely straight. In height the un-roundness is almost zero, and sideways it is a few millimeter only. Off course I have to see how the wheels will hold when I start riding the Imme.
After that I put on new tyres with an old-fashioned look, and statically balanced the complete wheels.
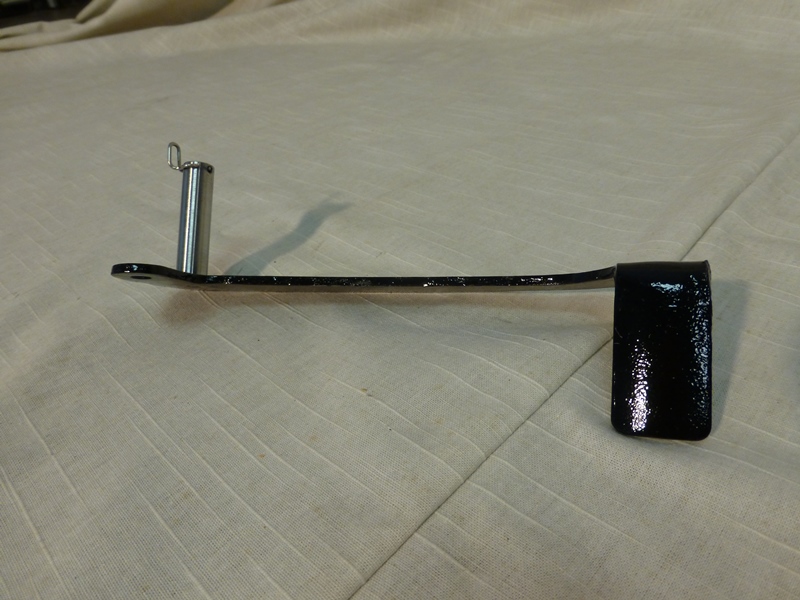
Further I had to make a new clip to mount the front brake handle, while the old one was torn. Although not as original, I made the new one from polished stainless steel as this did not require chroming:
The (flattened) old brake clip and the new one from polished stainless steel
The 2 "Gleitsteine" (shifting elements) of the gear change grip where both broken. While I was still puzzling how to make these (3-D printing?), I found a new set on an oldtimer event. Although I did not know if these were the right ones I bought them, for 5 euros only - for such a price it is worth the gamble! Back home they appeared to be fitting for 98%, I only had to fill up the space for the cable nipple in the outer one, because the hole was longer than the nipple. Lucky me!
The gear change cable itself could be re-used, after taking it apart for thorough cleaning and greasing. The other cables (front brake, throttle and clutch) were made new.
For the missing rear brake shoe I got an (original) replacement through the Imme Freundeskreis. Both brake shoes have been provided with a new lining. I glued them on with two-component epoxy adhesive (comparable to Araldite) and riveted them with copper blind-rivets for extra safety and a more original appearance. I already roughened them a bit with sanding paper for better brake efficiency.
Front brake with new lining
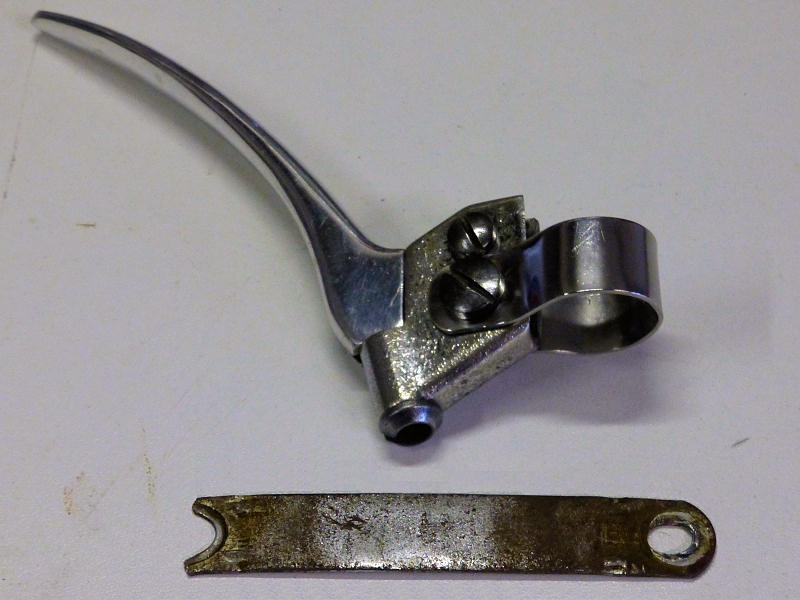
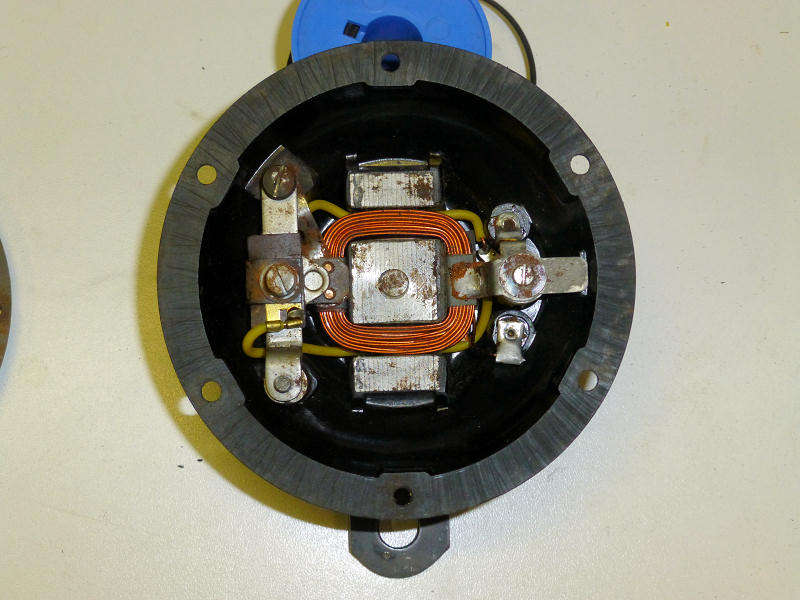
The electrical wiring had to be completely renewed. Of some parts of the original wiring (as far as still present when I bought the motorcycle) the insulation just fell off when I touched it. During the work I found out that both the main light switch in the headlamp and the horn did not work. This meant that I also had to take these apart.
Especially for the switch that was a bit problematic, as it was clearly not the intention of the manufacturer to make it detachable. I had to drill out 3 brass rivets, as you can see in the next picture:
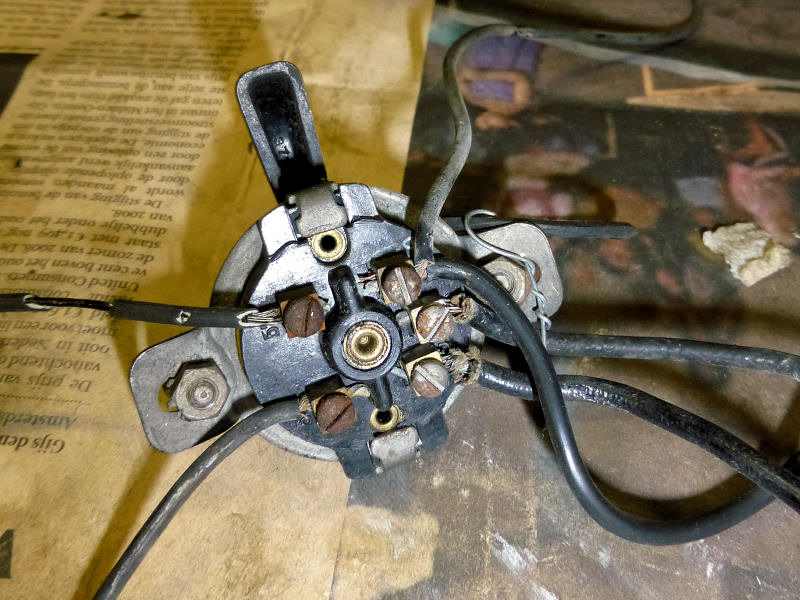
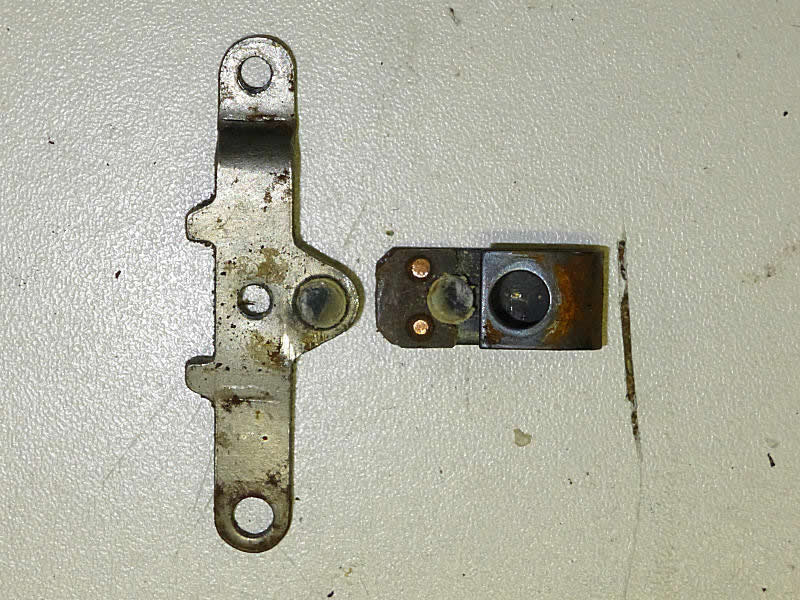
The light switch with the old wiring, with the 3 brass rivets clearly visible
The middle appeared to be not just a rivet, but the end of the axis of the switch lever! Fortunately I could fix this, by drilling a small hole in it and tapping thread for a 2.5 mm screw. But I first had to make a clamping-aid to get the lever in the lathe, so it took me some thinking and time.
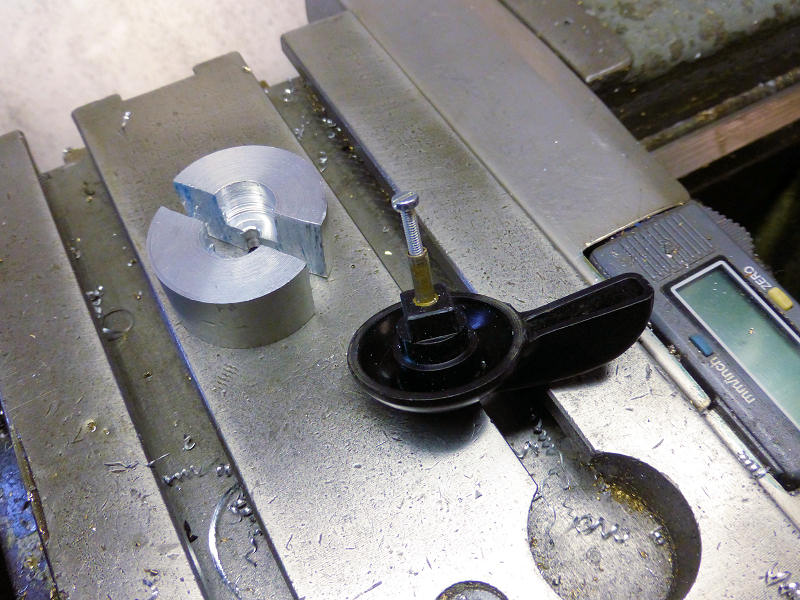
The lever with the screw - the aluminum parts were necessary to clamp the lever in the chuck of the lathe
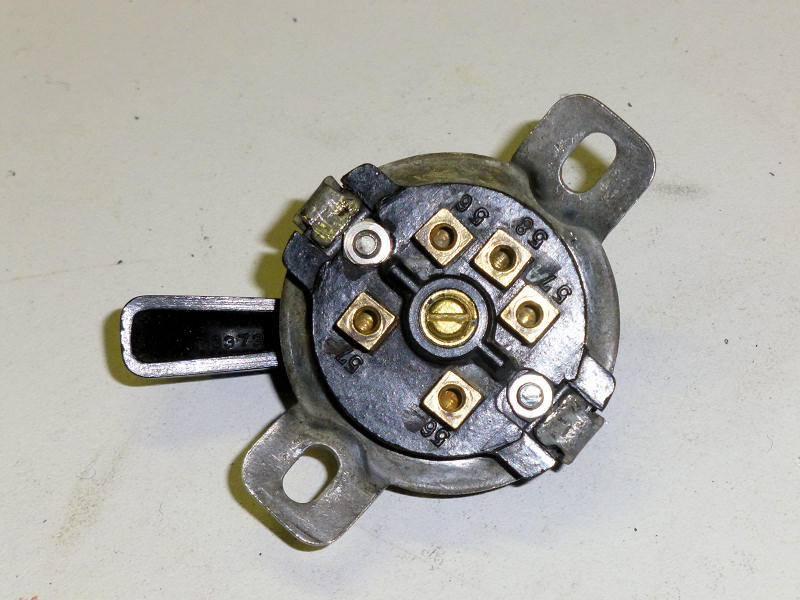
The repaired switch, now assembled with screws instead of rivets
The actual repair of the switch was a piece of cake, I only had to clean the contacts and bend them a bit to restore their function.
The horn was much easier to open, as it is just screwed together. After opening the contact breaker points appeared to be severely burnt and oxidized, and therefore they did not conduct the electricitry. After cleaning with sanding paper and a small file this problem was also solved.
The internals of the very solid Noris horn, left the contact points
The burned (black) and oxidized (green-yellow) contact breaker points of the horn
Off course I also needed a battery. Normally not a problem, but the (lead - sulphuric acid) battery in most Immes (from frame number 3475 onwards) had a triangular shape! Not a battery that you can buy in a shop. Fortunately Werner from the Imme Freundeskreis had made a few copies which look exactly the same as the original, but filled with NiCad batteries instead. He even has made a copy of the acid level indicator that was on the original Mareg battery:
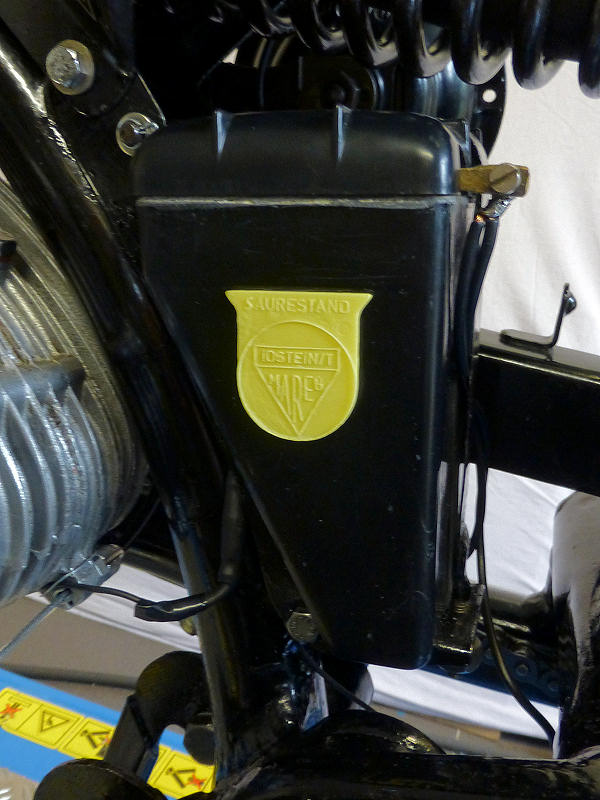
A very nice replica of the Imme battery - with acid level indicator
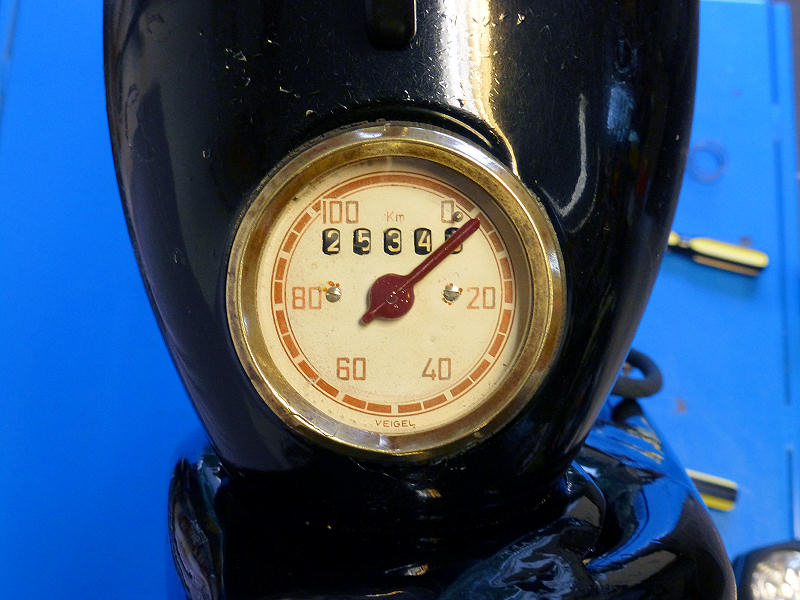
The speedometer was in bad condition. The inner side of the glass was dull and had circular scratches, and the axis with the needle seemed to be loose, as the needle made a wide swing when I just moved the speedometer a bit.
After opening it turned out that the axis itself was still OK, but the needle was completely loose from the axis. During riding it had probably been jumping up and down, and thereby scratched the "glass" which proved to be plastic. As the hole in the needle was completely worn out, it was not possible to fix the needle again on the axis. To solve this I made a dummy axis (1.0 mm diameter, with 1 flattened side), filled the hole in the needle with two‑component adhesive and put the dummy axis in. After drying I took our the dummy, and carefully pushed the needle on the actual axis.
Off course I cleaned the rest of the tachometer, including the dial, before assembling. After testing with a drill, I wanted to put on a new glass and chrome ring. But the new set was for a diameter of 64 mm, while the Veigel speedometer is 65 mm..... Therefore I polished the glass and the closing ring and put them back for now. It is surprising how well the polishing of the glass worked, as you can see on the next pictures:
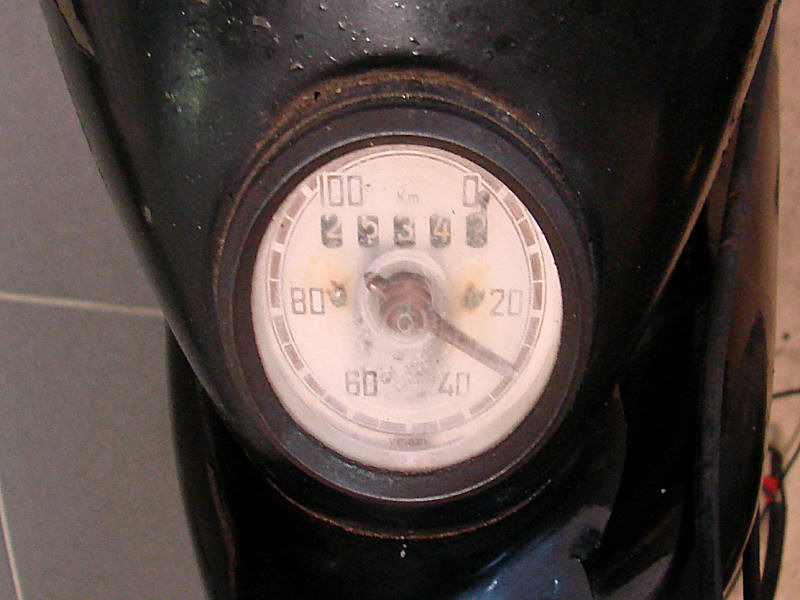
The speedometer as it was - should this really be the total distance ridden in 7 years?
The speedometer after repair, but still with the old glass and closing ring
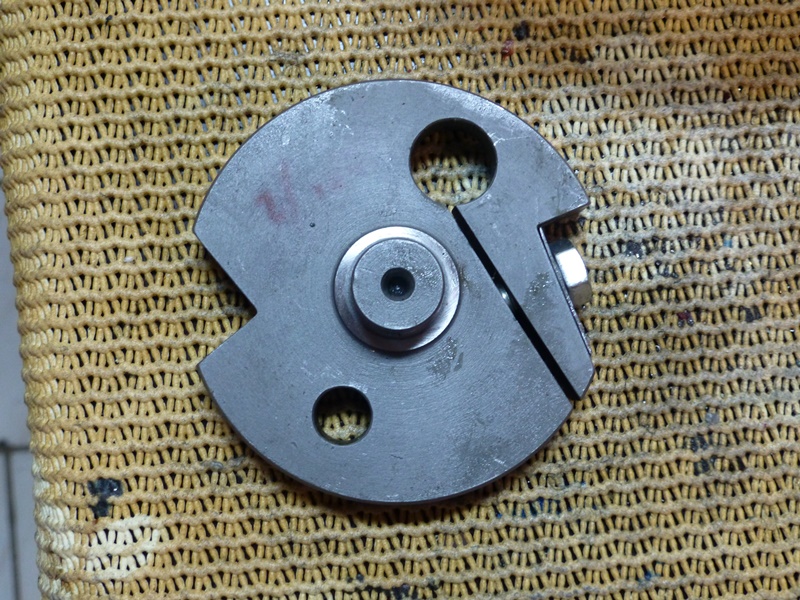
The last problem was the engine filter cover. When I first tried to mount it, it did not fit well. When the filter was put on the carburator, the hind screw was on the right place, but the cover was very far from the engine casing (up to 20 mm). The hole for the screw in the middle of the cover was not aligned with the threaded hole in the gear lever assembly, and the distance between the 2 parts was almost 10 mm (it should be 0).
Distance between filter cover and engine was 20 mm
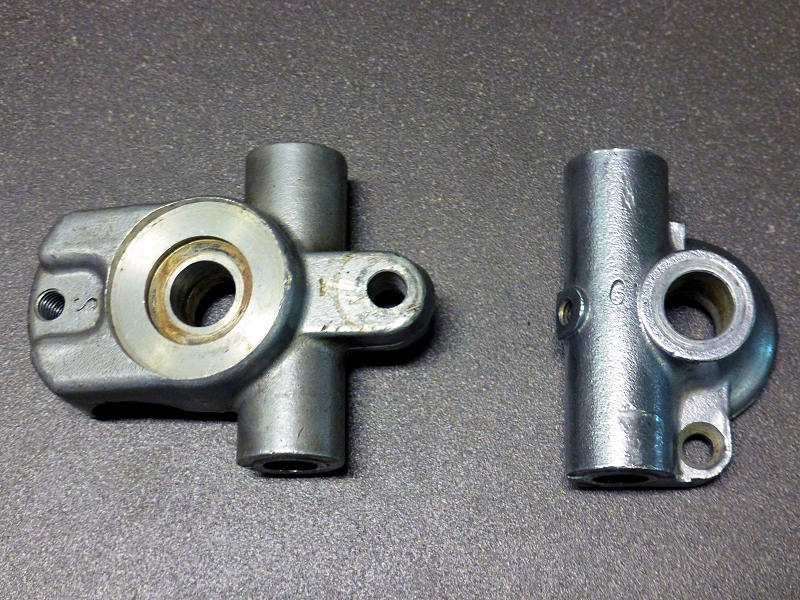
When I looked at the gear lever assembly (in German: Schaltbock) I saw that it was not completely straight on 2 places, and it looked like it had been welded in 2 corners after it had left the factory. After cutting the welds, straigthening and re-welding the aligment was OK. Now I only had to solve the distance problem.
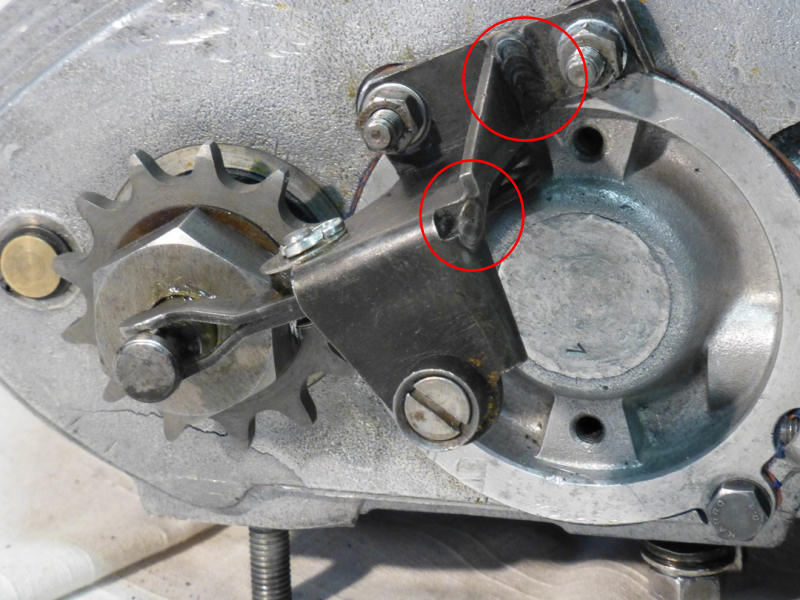
The gear lever assembly with the 2 welds (in the red circles)
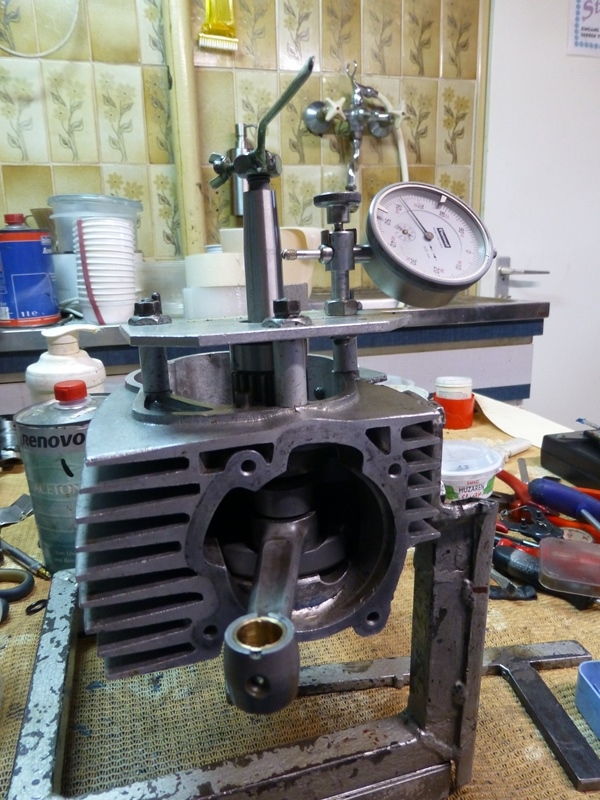
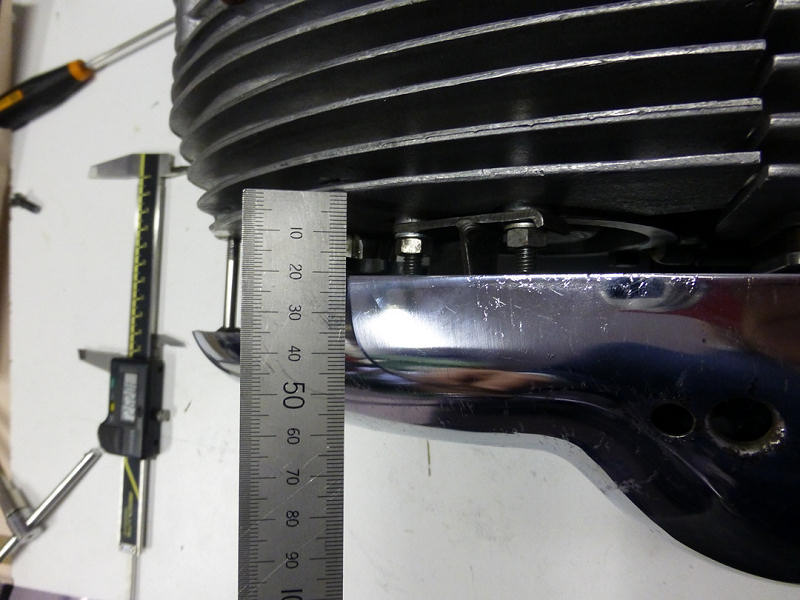
The carburator could not be pushed completely over the inlet manifold. This was solved with a bit of sanding paper and some grinding and filing. The heat bridge between the cilinder and the manifold appeared to be 6 mm thick, while it should be between 2 and 4 mm. I took of 2 mm, to keep enough material left for proper insulation.
By these modifications the distance between the filter cover
and the engine was reduced to 12 mm on the front and 16 mm at the back, which I found acceptable. Next I made a new distance piece for the hind screw (the original was missing) and mounted the cover.
Now only the distance between the gear lever assembly and the cover was still too large. I measured the gap and made a new, longer screw stub (the cilindrical
part with the screw in the foto above). After welding this onto the gear lever assembly I could finally mount the engine cover neatly parallel to the engine on an acceptable distance, with both screws correctly aligned.
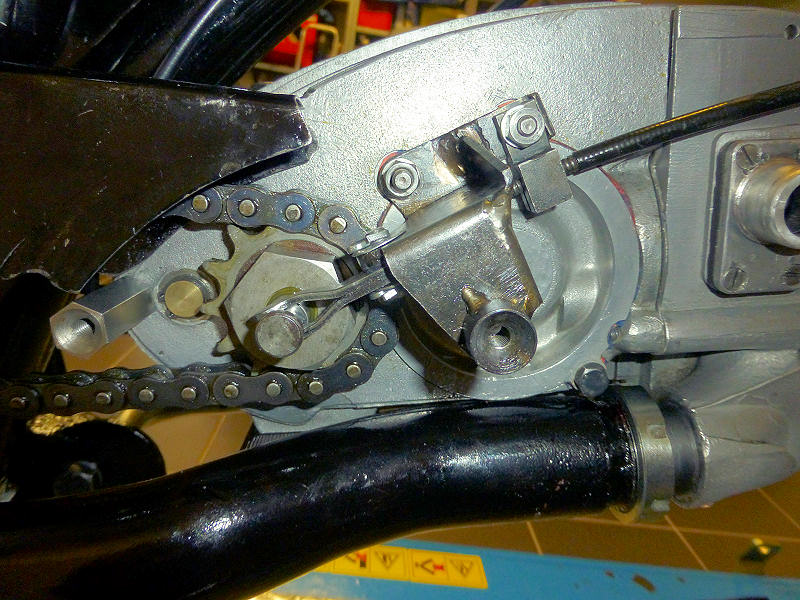
The modified gear lever assembly with the longer screw stub, left the distance piece for the hide screw

The mounted filter cover - 12 mm from the cilinder
The mounted filter cover - 16 mm from the engine carter
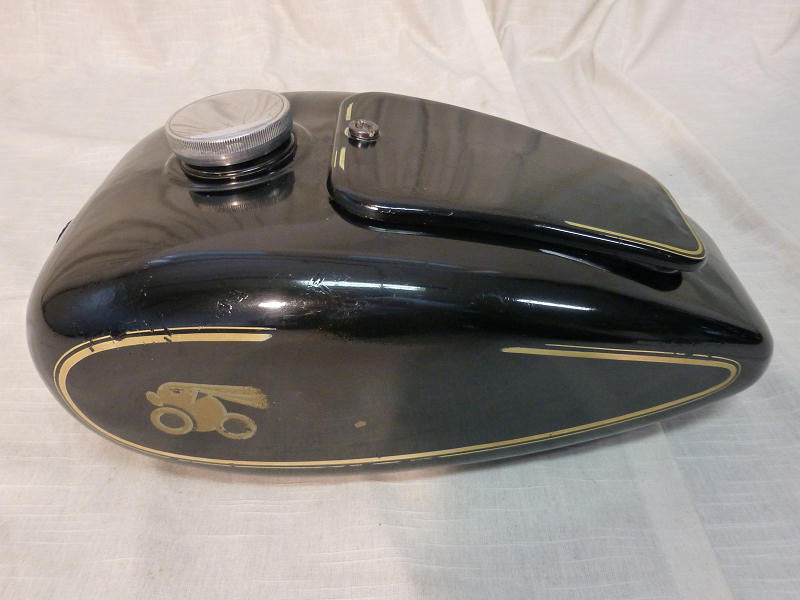
Final result
After all this work the total bike could be assembled again, and after that the end result looks like this:
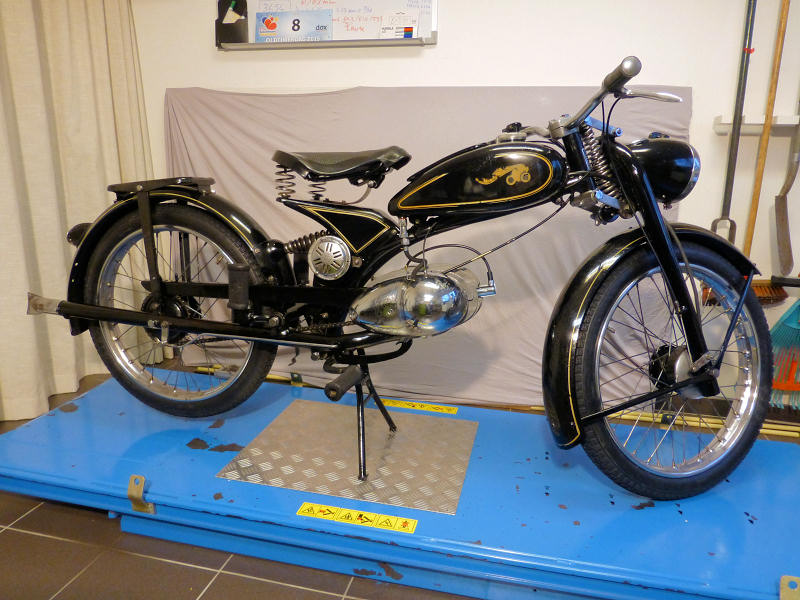
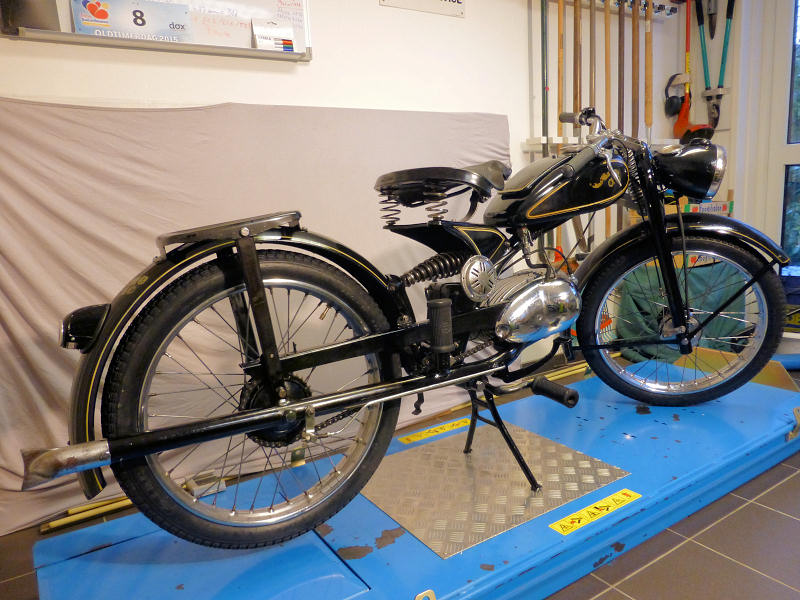
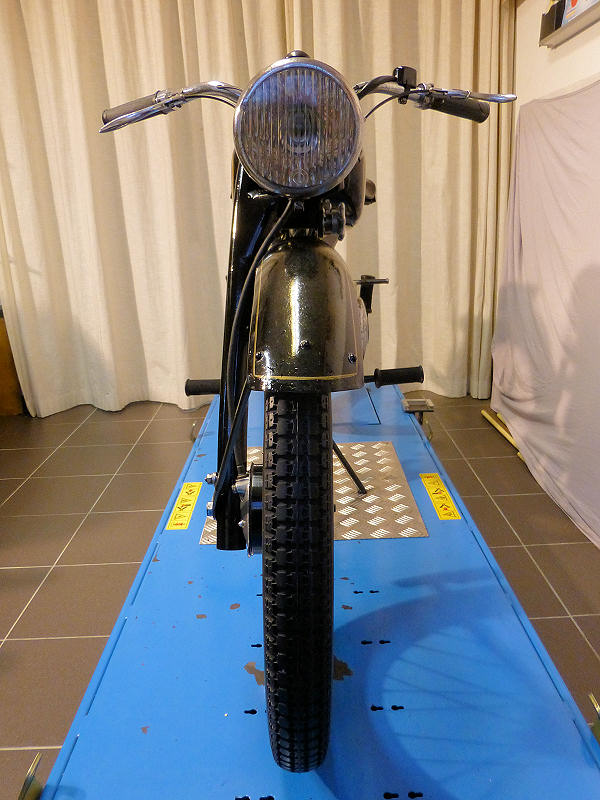
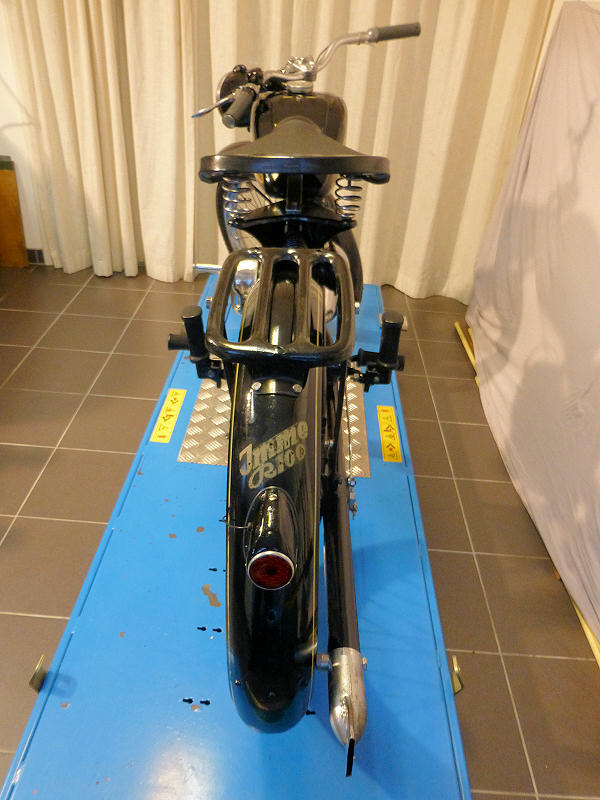
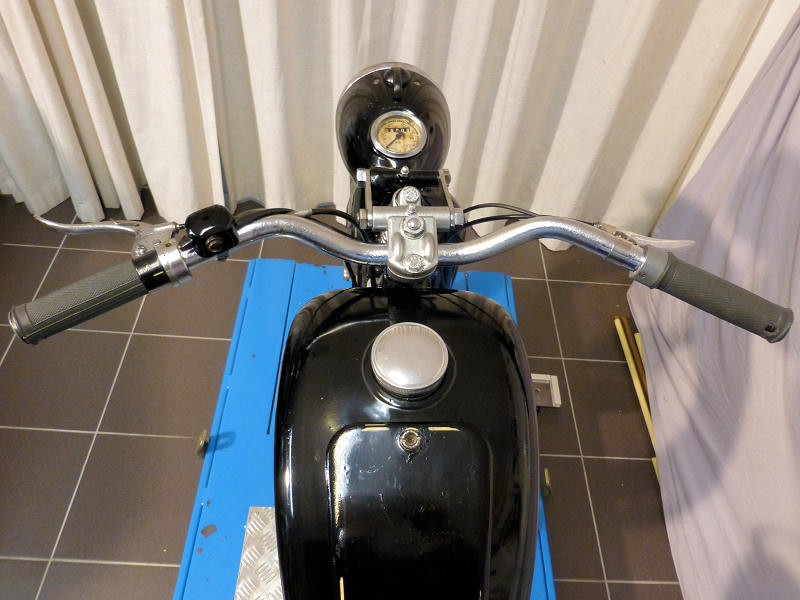
This is what I hope to see a lot while driving
(the tacho is a temporary replacement until the original is finsihed and tested)
Now I have to wait for nice wheather for a test drive. At the moment there is snow and salt on the road, I guess I will have to wait several weeks.
I am pretty sure that there will be some minor problems to solve and things to optimize. My goal is to have the Imme in a good riding condition and registered before the meeting of the Imme Freundeskreis in Immenstadt, early June 2016.
|
